Key Word(s): Docker
 APCOMP 295 Advanced Practical Data Science
Demo 3 - Web DB servers on minikube
Harvard University
Fall 2020
Instructors: Pavlos Protopapas
Deploy your container to a Kubernetes Cluster
Last week we built a dockerized web + db application now the goal is to deploy it on Kubernetes Cluster.
Prerequites
You will need to have installed kubectl and Minikube according to the instructions.
This part of the Kubernetes tutorial was adapted from https://medium.com/@yzhong.cs/getting-started-with-kubernetes-and-docker-with-minikube-b413d4deeb92.
Setup
- Run
minikube startin your Terminal window.- You should see several lines beginning with emojis. The last line should say
Done! kubectl is now configured to use "minikube". - You now have a virtual cluster running on your machine/computer. You can think of this cluster as running a virtual machine on your personal computer.
- You should see several lines beginning with emojis. The last line should say
- Kubernetes organizes Docker containers into Pods. Docker containers in the same pod share CPU allocation and memory. Typically, you would want multiple Docker containers in the same pod because they must interact to achieve some process, such as dealing with reads and writes to a database. Some info on why a pod may have multiple containers.
- To create a pod, we must also create a Deployment, which is basically a set of rules for how much CPU and memory a pod should have access to and different labels/names for a pod. Additionally, a deployment specifies what should happen to a pod if it stops running.
- To create a pod, we must also create a Deployment, which is basically a set of rules for how much CPU and memory a pod should have access to and different labels/names for a pod. Additionally, a deployment specifies what should happen to a pod if it stops running.
Deploy DB
Deployments can be configured from the command-line, but this becomes difficult when you have many parameters to specify. Therefore, users typically generate a YAML file specifying the details of their deployment, which is what we will do as well. It is convention to name the deployment object the same as the YAML file.
- Please download the
hello_world_db_deployment.ymlfile from the course website and place it in the same directory you created for lecture2. - The name of our Deployment is
hello-world-db-deployment. - We only want one pod for our deployment, as indicated by
replicas: 1. - The
selectordefines how the Deployment finds which Pod(s) to manage. In this case, we simply select a label that is defined in the Pod template. That’s what the two books-app fields are for. - We specify the Docker image and version we want to use-
pavlosprotopapas/ac295_lecture2:db. TheimagePullPolicyis set toAlwayssince we want to pull the Docker image from Docker Hub whenever we create a new Pod. I already pushed our database server Docker image to a repository on Docker hub, making it easier for us to deploy the Docker image with our web application using Kubernetes. - You can see that we expose port 8081 for the Pod.
- We can create a deployment for our Docker image using
kubectl create -f hello_world_db_deployment.yml. - You should get a message saying "deployment.apps/hello-world created".
- You can now use the
kubectl get deploymentscommand to see that your deployment is available, meaning it is ready to receive HTTP requests. Usekubectl get podscommand to see that pods are running.
Deploy Server
Now, the Pod is running our database server running on our Kubernetes cluster, however this server is not exposed to the outside world because it is encapsulated within the cluster. Check this by trying to connect to http://localhost:8081/. You should get a connection error. We need to now create a deployment for our front-end web server, so that we can access our web application.
Let's create a deployment for our front-end server.
- Please download the
hello_world_server_deployment.ymlfile from the course website and place it in the same directory. - Remember that we need to have our front-end server connect to our database server, like we accomplished when we were just running the Docker containers on our local machines. To accomplish this, we need to know the internal IP address that Kubernetes has assigned to the Pod running our database server. This IP address can only be used from within the Kubernetes cluster. We can get this IP by running
kubectl get pods -o=custom-columns=NAME:.metadata.name,IP:.status.podIP. - Open up the
hello_world_server_deployment.ymlfile and make sure the IP you get for thehello-world-db-deploymentis the same IP address specified in thevaluefield for theDB_URL. If it is the same, then you're good to go. If it is different, then please change it.- You will also see that we specify port 8080 as a communication port for the Pod.
- Now, we can run
kubectl create -f hello_world_server_deployment.ymlto create a deployment for our front-end web server. - Use
kubectl get deploymentsandkubectl get podsto see that your pods are running.
- Please download the
Now that we have both parts of our application running, try visiting http://localhost:8080/. Can you access the web application? The answer should be no because although we have exposed ports for our Pods, they are not accessible to the outside world. So far, we can only communicate with the Pods running our application if we are within the Kubernetes cluster (again, this is for isolation purposes). Let's check this out from within the cluster.
- Run
kubectl get pods -o=custom-columns=NAME:.metadata.name,IP:.status.podIPand copy the IP address for thehello-world-server-deployment. - Run
minikube sshin your Terminal window. You should see "minikube" written in you Terminal window. - Run
curlseveral times. You should get responses for "Hello world!" in different languages, demonstrating that the application is working.:8080/ - Run
exitto exit the minikube Terminal.
- Run
Expose to the world
To be able to access our web application from outisde, we need to create a Kubernetes Service to make the
hello-worldcontainer accessible from outside the Kubernetes virtual network.- Use
kubectl expose deployment hello-world-server-deployment --type=LoadBalancer --port=8080to allow your container to receive HTTP request from outside. - You should get a message that says "service/hello-world exposed".
- Use
You can view the status of your sercice by using the
kubectl get servicescommand.- Notice that the
EXTERNAL-IPfor our service is pending. If we were running our Kubernetes cluster using a cloud provider, such as AWS, we would get an actual IP address to access our service from anywhere. - Since we are running Minikube, you can access your service by using the
minikube service hello-world-server-deployment. This should automatically open a web page with ourHello world!page. Reload this page a few times to see the different "Hello world!" translations.
- Notice that the
Congratulations! You have deployed a web application using Kubernetes!
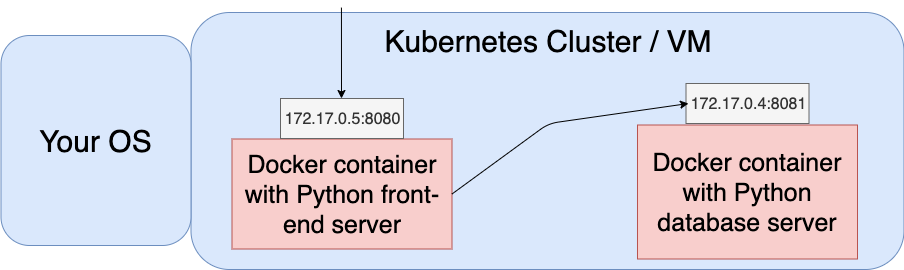
Below is a schematic of your Dockerized web application on a Kubernetes (K8s) cluster. The two servers are running in individual Docker containers within the Kubernetes cluster, which is emulated by a VM in your case. Generally, a Kubernetes cluster would exists across serveral machines on a cloud provider like AWS. The K8s cluster takes care of generating a network for us and provides individual IP addresses for each of our Pods, reducing our work. By creating a K8s service for your web application, you provide outside users an entry point to use your application while protecting your database.
Clean Up
You can clean up the resources and cluster using:
1. `kubectl delete service hello-world-server-deployment`
2. `kubectl delete deployment hello-world-server-deployment`
2. `kubectl delete deployment hello-world-db-deployment`
3. `minikube stop`
3. `minikube delete`