Coursework
Course Format
The course consists of a mixture of lectures, homework and a final project. Lecture exercises, and most homework will be provided through Jupyter notebooks. Details on each course component can be found below. All course work will be hosted on your private GitHub repository.
Course Workflow
All of your work (except for the class project) will be hosted on your private GitHub repo named
githubusername/cs107_<firstname>_<lastname>(Please use all lowercase letters!).
It is critical that you set up a private repo (free for students) and give the
teaching staff GitHub account
(cs107-sys-dev) access to your private
course repo. There are two reasons for keeping this repo private. One is so
that other students cannot see your work. The other reason is because the
teaching staff will be providing comments and you may not want other students to
see these.
Before arriving at each class, you should download the lecture to your local computer, copy it to your course repo, and push the changes to your remote course repo. Even though you will be able to see the lectures on the course website, this procedure will make sure you have an up-to-date personal course repo that accurately reflects the course content. This may be helpful for your future records.
Deliverables for this course will be submitted via GitHub (see below for exact instructions). Make sure you push all changes to your repo before each deadline. The teaching staff will check out your latest work, grade it, provide comments. We will be able to see if you've submitted your work on time or not.
Course Repository Structure
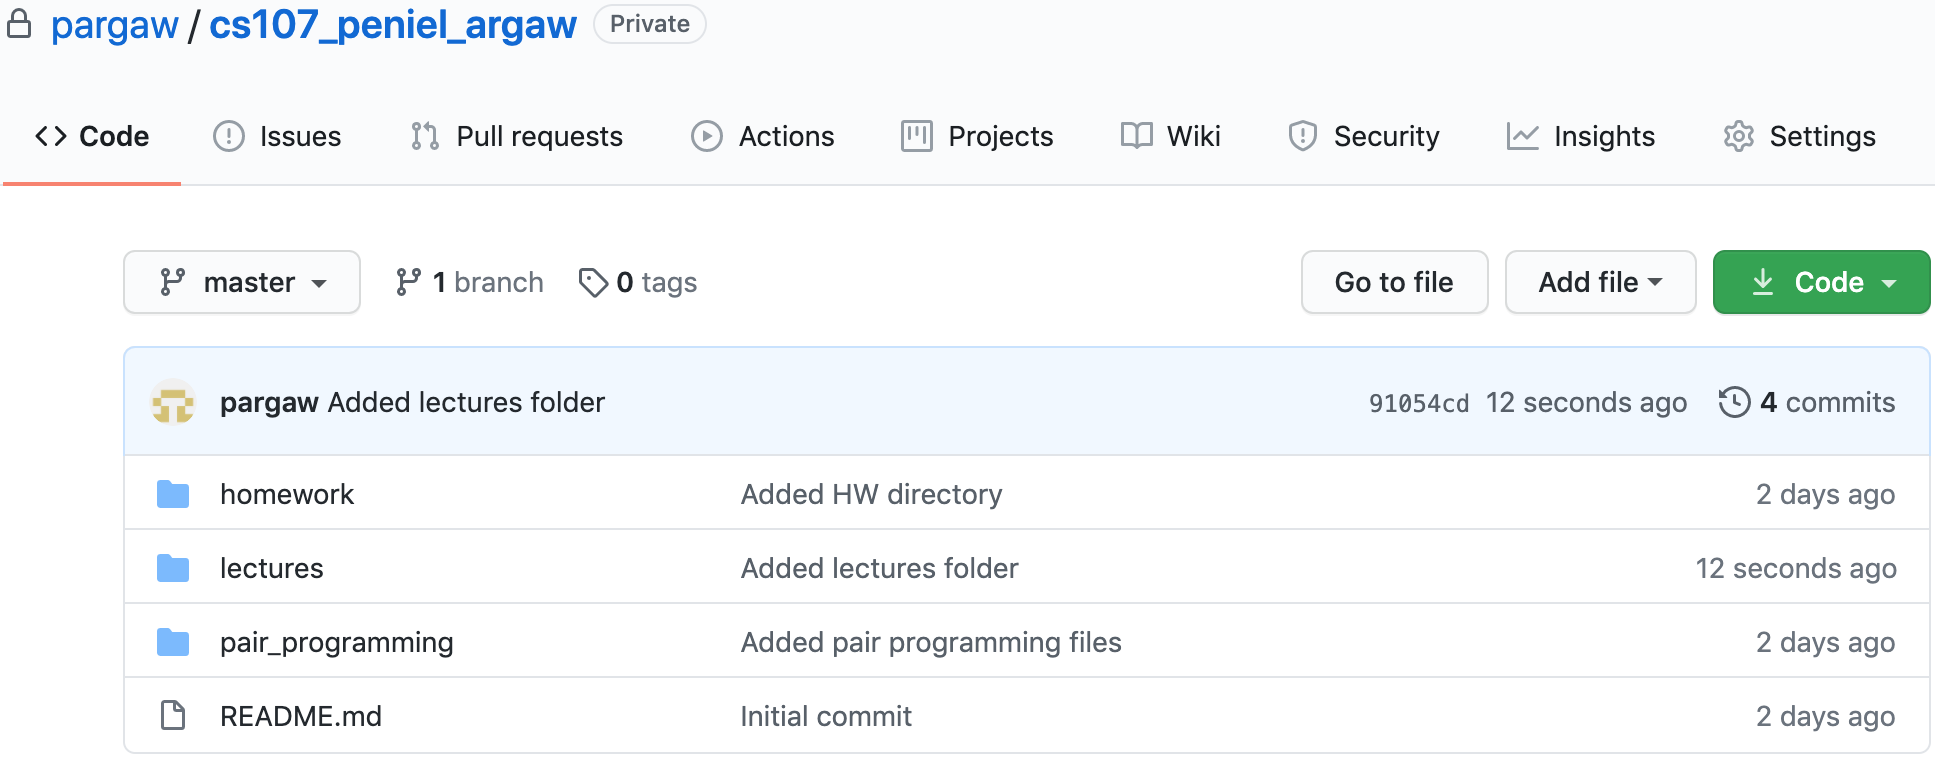
Your private GitHub repo should have the following structure:
The class project will be done in groups of 3 to 4 students. You should create
a GitHub organization with your group members and add the teaching staff to it
(cs107-sys-dev). The organization will be
called cs107-*, where the * wildcard represents any string of characters and
the project repo should be called cs107-FinalProject. The group is free to
make other repos within the organization for experiments and prototyping, but
cs107-FinalProject is the one we will grade. Project
milestone1A provides more details.
Project Repository Structure
Your project GitHub repo should look similar to the following:
- Creation of the
cs107-FinalProjectrepository in thecs107-sys-dev-orgorganization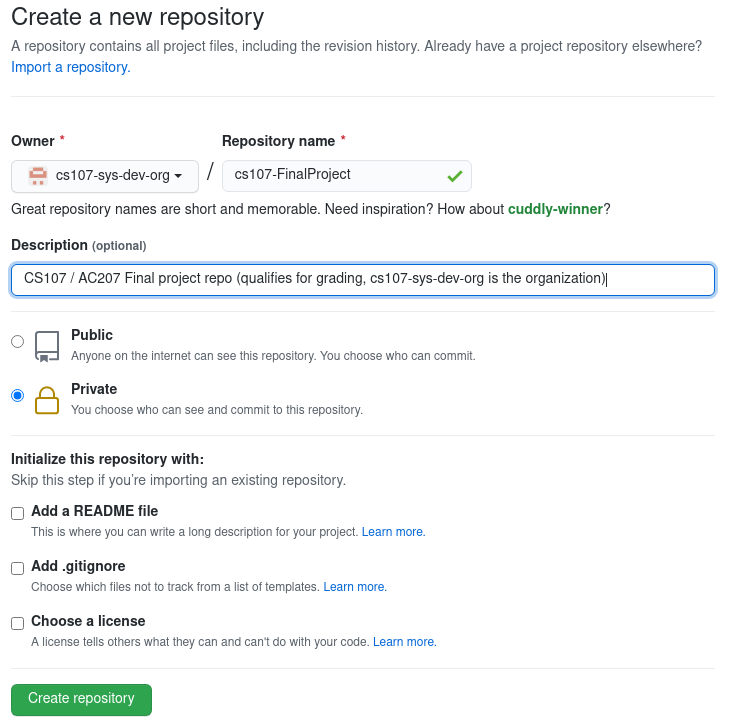
- Overview of repositories in the
cs107-sys-dev-orgorganization. The GitHub usercs107-sys-devis member of this organization. Invite this user also in your organization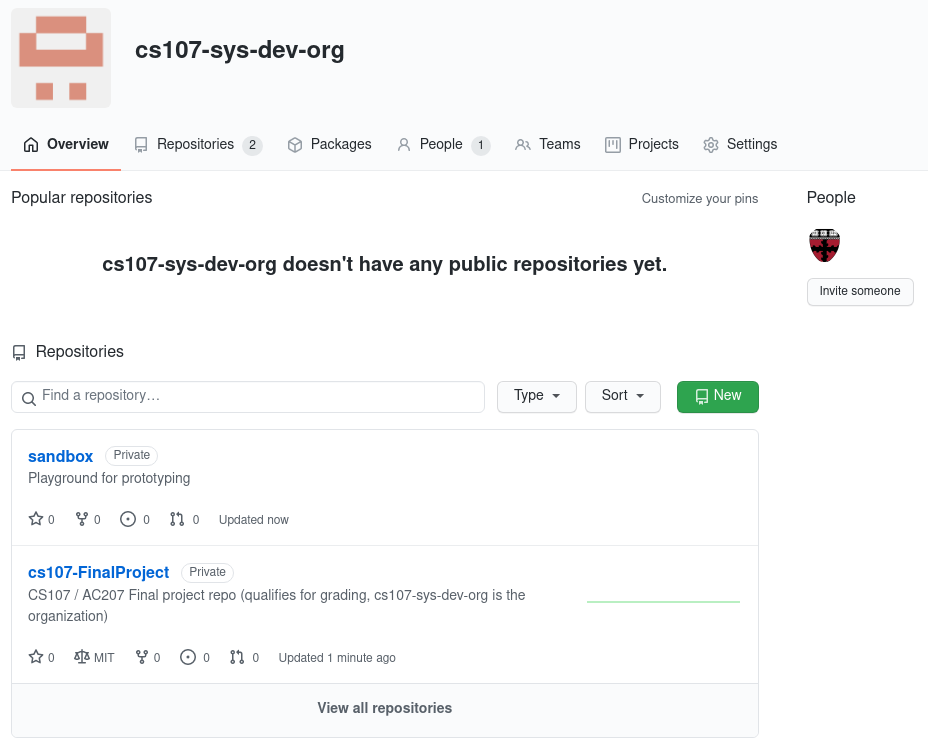
A Note on Jupyter Notebooks
Jupyter notebooks are great for code prototyping and
learning how to use new features and APIs. They are also wonderful for creating
documentation and interactive reports and even delivering lectures. However,
they are not suitable for large software development projects! One reason
for this is because code development in Jupyter notebooks represents a nonlinear
development process. Another reason is that there is presently no good solution
for version control of Jupyter notebooks. A second reason is the question of
efficient source editing. Jupyter notebooks are designed for interaction with a
GUI (e.g. through your web browser) which can only offer a limited set of tools
to edit content. Source code is plain text and a powerful editor (vim,
emacs, sam, eclipse and others) can not be replaced by interaction with a
web browser for example. A helpful tool to convert (back and forth) Jupyter
notebooks to plain text is Jupytext.
Therefore, in this class you must turn in all homework written in proper Python
(.py) files. You are also encouraged to leverage this opportunity and learn
how to use a powerful text editor like vim (or
neovim) or emacs
to do your main code development (especially if you find yourself working with
text files a lot). If you feel uncomfortable with these tools, you may want to
look into an Integrated Development Environment (IDE) of your choice (e.g.
Spyder, Atom,
Eclipse and many others).
Homework assignments and lecture exercises turned in with Jupyter notebooks will not be graded.
A homework workflow is outlined in the Homework section.
Lecture Format
The lecture format for this course consists of two weekly lectures and pair-programming sections. The basic structure is as follows.
Lectures
In-class lectures will be delivered on Tuesdays and Thursdays. Attendance at these lectures is mandatory. Lectures will each take 75 minutes and will consist of a mixture of instructor content delivery (lecture slides, demos) as well as interactive discussions and small exercises. Topics discussed in the lectures are relevant for pair-programming sections as well. The lectures will be accommodated with small quizzes to test how well the material of the class is absorbed. These quizzes will not be graded.
Pair-Programming Sections
Pair-Programming will form an essential part of the course. Pair-programming will take place in mandatory pair-programming sections led by members of the teaching staff. A schedule for the pair-programming sections will be released in the first week of class.
The first pair-programming section of each week will take place on Friday. You
MUST attend at least one pair-programming section each week. You are free to
attend any section that you desire in any given week. During these sections, you
will work on coding exercises that will build upon the concepts covered in
lecture. The exercises will be released to the course website on Friday morning
each week and solutions will be released one week after the final
pair-programming session for that cycle. For example, the exercises will be
released on a Friday morning and pair programming sections will be held on
Friday, Monday, Wednesday and Thursday. The pair programming exercises will be
due one week from that Thursday no matter when you attended the section. You
must turn in your exercises (in your private GitHub repo on the master or
main branch) before or on that due date (it should be possible to finish the
exercises during the section). The teaching staff will grade pair-programming
exercises for attendance and completeness, do not worry if you did not get
them perfectly correct. Since you will be pair-programming with partners and
with members of the teaching staff, these exercises are almost free points.
Please complete the exercises!
Exercises performed during pair-programming sections should be put under version
control similar to homework assignments (see Homework section below)
but you must not branch off master or main and create a pull-request for
it. Just add and commit your work on the master or main branch and push
to your repo. The pair-programming exercises must adhere to the following
directory structure:
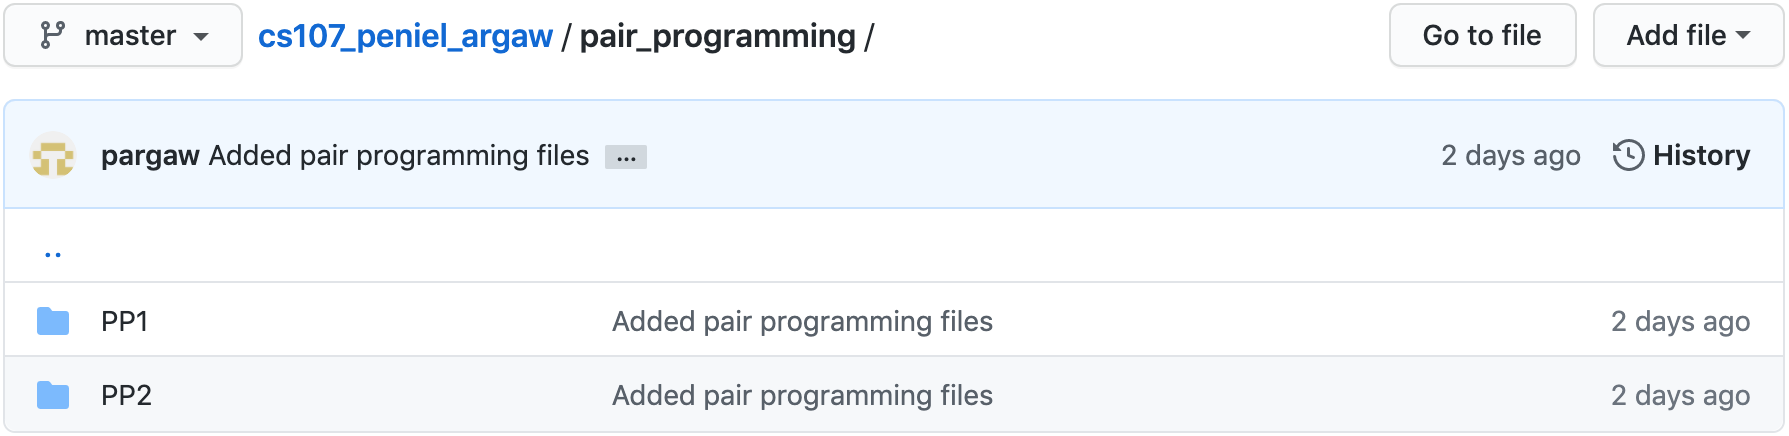
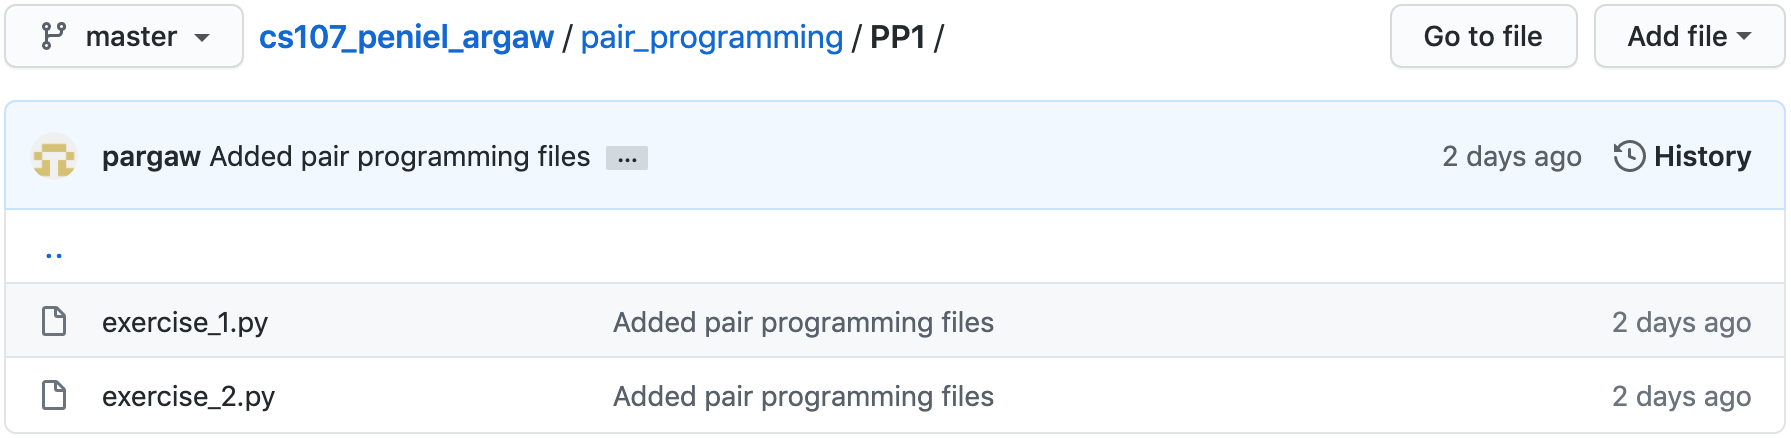
- Your private GitHub repo should contain a directory named
pair_programmingwith sub-directories for each session. The sub-directories should be namedPPnwherenis the session number. - Within the sub-directory
PPn, place the exercise files that you completed during the pair-programming sections. The exercises must have the nameexercise_m.extwheremcorresponds to the exercise number andextis the proper extension (.py,.sh,.c,.cpp) depending on the exercise. - Remember: These exercises will be mainly graded for completeness and to make sure you are on the right track. Please carefully follow the required repo structure. That is the easiest way to get full points.
Here is how a sample GitHub repo should look like:
Pair-Programming Workflow
In class we are focusing on command line tools for the development of software projects in computational science. It is important that you get familiar with a small selection of such tools and integrate them in your development process. The pair-programming sections aim at combining some of these tools together to provide you with hands-on experience while developing software. The key is the "pair" in pair-programming. The exchange of knowledge between team mates in these pair-programming sections is essential for learning said tools or learning something new you did not know before.
The pair-programming works by using a tool called tmate
which is based on the tmux terminal multiplexer. It allows for easy sharing
of a command line session or a specific instance of a program in read/write and
read-only modes via ssh or web browsers. Check out this blog
post if you
like to read a bit more right now.
There is no X11-forwarding (forwarding of graphical output or GUI) in tmate
which means that we will be having some fun in the command line. Text file
editing will be performed in any text editor that supports a text-based user
interface (TUI). Recommended choices are vim or emacs.
If you are mainly working on a Windows operating system, you should install the Windows Subsystem for Linux. A small guide for doing so can be found here.
Side note: tmate is not only great for pair-programming but it is also an
excellent tool to start a debugging session if something does not work as
expected. It is very easy and fast to start a shared terminal instance.
Required Pair-Programming Protocols
Now that you have learned about sharing terminal instances, it is time to understand how to do some pair-programming. The exercises in the pair-programming sections are necessarily collaborative. In fact, each member of the group will turn in the same script! How is this fair and how can this possibly work? Follow the structure below:
- For each exercise (or sub-exercise for big problems), there will be one sharer, one coder, and one listener. This assumes a group size of 3. If the group only has two people, then either one of you can take the sharer's role.
- The sharer will start each coding session and document interactions including points of contention and challenges. The coder will be in charge of writing the code. The listener will make suggestions and may offer tweaks from time to time.
- The sharer starts a new
tmatesession and invites the other team mates to join the session. Ideally you want to start the session inside the directory of the current pair-programming exercise in your GitHub repository. You may share a read/write link either throughsshor a web browser. Note: the sharer allows the other mates access to sharer's computer. Any abusive behavior that may cause harm on the sharer's system will not be tolerated and are forwarded to the dean's office. - After the team mates have accepted the invite, they will be able to share the terminal instance and can create new files or execute Python together. You should clearly communicate with each other to avoid character interference from multiple mates typing at the same time.
- The team should discuss a strategy on how to approach the exercise.
- The coder should start writing some code with input from the other two team members.
- Before each section that you work on, place a comment indicating which team
member worked on that section. For example, a
bashscript could look like this:
#!/usr/bin/env bash
# File       : exercise_1.sh
# Created    : Sat Aug 07 2021 04:58:49 PM (-0400)
# Coder      : Alice
# Listener   : Bob
# Sharer     : Alice

echo 'Hello World'

### Main point of contention: whether to capitalize "W" in "world"
- For small exercises, each team member can play a single role once.
- For large exercises, the team members may rotate roles. The exercise will make it clear when you should rotate.
- At the end of the exercise, the developed code is inside the sharer's
gitrepository that can readily be committed. Links to download these files can be shared with the other team mates such that they can update their repositories as well. Note that the exercise code will contain comments pertaining to who worked on which section.
Homework
There are 7 homework assignments. The homework will be released on Tuesdays and due at 11:59 PM Boston time two weeks after they are released. Exceptions to this policy will be announced in class and can be seen on the Course Schedule. Specific instructions in each released assignment override these instructions.
- Homework is worth 25% of your final grade.
- Your private GitHub repo should contain a
homeworkdirectory with sub-directories for each homework assignment. The sub-directories should be namedHWnwherenis the assignment number. - Within the sub-directory
HWn, place the assignment files that you want us to grade in a directory calledHWn-finalwherenis the assignment number. We will only grade appropriately-labeled assignments! - To emphasize proper
gitworkflow, all of your homework assignments will need to be completed ongitbranches other thanmasterormain. You will then need to make a proper pull request and merge from a development branch, calledHWn-dev, into yourmasterormainbranch. Please see the example below. You will lose points if this workflow is not followed. - New homework will be assigned on Tuesday and are due on Tuesday night at 11:59 PM (Boston time) two weeks after their initial assignment.
Grading Scale
Homework will be graded on a 100 point scale:
- 100 = Solid / no mistakes (or really minor ones)
- 80 = Good / some mistakes
- 60 = Fair / some major conceptual errors
- 40 = Poor / did not finish
- 20 = Very Poor / little to no attempt.
- 0 = Did not participate / did not hand in
Example Homework Workflow
The easiest way to understand the assignment workflow is by example. We provide an artificial scenario below, which you can use as a template for all homework assignments.
Note: Specific instructions provided in each homework assignment override the following instructions.
Note: The following workflow will count for 10 points of each homework assignment.
Suppose homework assignment 3 consists of 4 problems.
Homework Setup
- Make sure your
masterormainbranch is up-to-date.- Use
git pullto update your localmasterormainbranch so it is in-sync with your remote branch.
- Use
- From your local
masterormainGit branch, create a new development branch calledHW3-dev.- Use the
git checkout -borgit switch -c(more recent versions ofgit) command to create a new local development branch. - We will only be grading the work you do on this development branch. You
will lose 5 points if you do not do your development on the
HW3-devbranch. You are free to make other branches off ofHW3-dev, say for individual problems, but you are responsible for making sure you merge these additional branches into theHW3-devbranch.
- Use the
- Within your
homework/directory, create sub-directoryHW3/. - Under the
HW3/directory, create sub-directoryHW3-final/. - Only files within
HW3-final/will be graded.HW3-final/should consist of onepythonfile for each problem:P1.py,P2.py,P3.py,P4.py- Each file should run and return the required output.
Local Development
- You can now do all of your development within your
HW3/sub-directory on yourHW3-devbranch. As you create and change files, please commit early and often to your development branch.- Use the
git add <file_name>command to stage files you have changed for a commit. - Use
git committo create a commit & message for your repo.
- Use the
- Once you have begun some local development, it is a good idea to push your
local development branch and current progress to your remote GitHub repo.
- Use
git pushto push local branch/commits to your remote repo.
- Use
- You may want to undo changes/commits you have made for some reason.
- Use
git checkout -- <file_path>to undo changes to a single file. - Use
git revert <commit_SHA>to undo the changes in a specific commit. - Use
git reset --hard <commit_SHA>to undo all changes since the<commit_SHA>specified. This changes your Git history, so BE CAREFUL using this command, especially if other developers work on the same remote.
- Use
- Once you feel that you have completed a problem, please copy the code to an
appropriately-labeled file within the
HW3-finalsub-directory. All code for Problem 1 should reside in a file calledP1.pyinHW3-final/, all code for Problem 2 should reside in a file calledP2.pyinHW3-final/, and so on.
Pull Request
Once you have pushed your local development branch and commits to your remote
repo, you should create a pull request (PR) to merge the changes in your
development branch into your remote master or main branch.
There are two ways to accomplish a PR on GitHub:
- Through the browser on the Github website. You can create a PR to merge your
changes from
HW3-devintomasterormain. -
Alternatively you can use the GitHub command line client to create pull requests from the command line. This method is helpful if you get distracted from the context switch that is associated with the first method.
-
Please make sure any files you want us to grade are in the
HW3-final/directory.
You will lose 2 points if you do not create a PR.
IMPORTANT: DO NOT merge your PR into your
masterormainbranch because we will be providing feedback on your homework through this PR. You will lose 3 points if you prematurely merge your PR and prevent us from properly providing feedback.
A remark on this workflow: This PR process through GitHub is not typically
the way you would work on a project solely owned by you. This workflow is more
typical of how you would work on a group project or at a company in which
someone else will review your code before you can merge your code to the main
upstream branch. We want you to become accustomed to this type of workflow. It
is a good idea to always use separate development branches, Git is designed for
cheap branching. You should not commit straight to your master or main
branches until the changes have thoroughly been tested. For example, when you
want to contribute to the source code of
git itself, your contribution
has to graduate through the following integration branches before it ends up
in the master branch, which is then considered for the next release (in
chronological order):
seen: responsible maintainer has "seen" your contribution, but it is just not quite ready yetnext: intended for stability testing of code that will graduate intomastereventuallymaster: tracks the commits that should go into the next release (what you obtain frombrew install gitorsudo apt-get install git, etc.)maint: for updates of previously released stable versions (maintenance)
Such rigorous graduation of contributions ensures stability in software, yet it
is still not always possible to avoid the infiltration of bugs. You may also
want to read this contributing to a
project topic
in the git documentation.
Pull Request via Browser
- From the GitHub website of your course repo, click on the "Pull Requests" tab

- Create a new Pull Request

- Select your homework branch as the branch to compare to
masterormain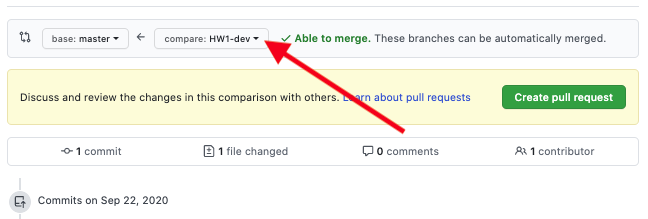
- Click "Create Pull Request" to create a pull request draft
- Now click "Create Pull Request" again on the draft page.
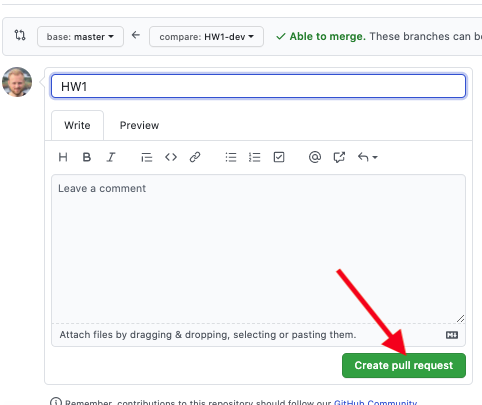
- You have now created a pull request. Please DO NOT merge this PR into
your
masterormainupstream branch until you have received feedback from us.
Pull Request via Command-Line
Assume you are in your private GitHub repo and you have committed your work that
you want to submit for HW3.
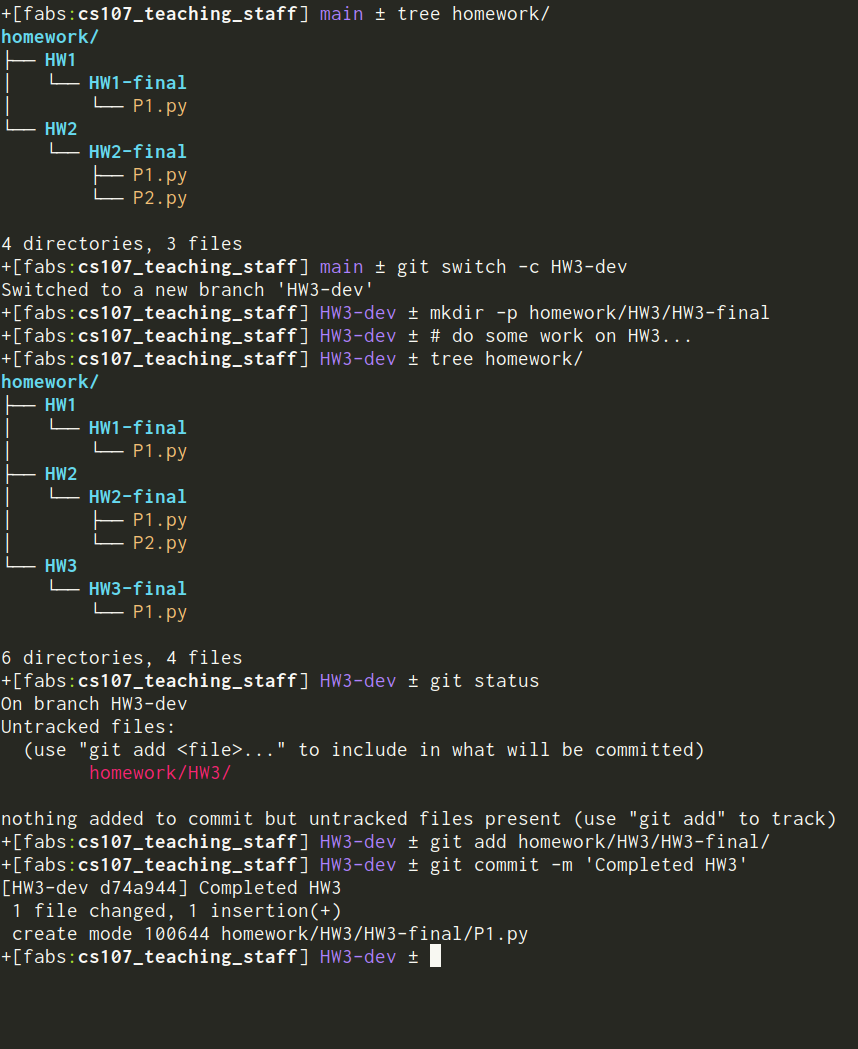
In the figure above, you started on the main branch with two previously
completed homeworks HW1 and HW2. You then switched to the HW3-dev branch
in order to start work on HW3. After you have completed work on this
homework, you check the status and decide what should be added to the
HW3/HW3-final sub-directory (in this case only P1.py was added). You then
committed your work on the HW3-dev branch (hopefully more than just one
insertion 😊). You are encouraged to push multiple small commits during the
process of solving homeworks. In this example we only pushed one commit to the
remote repository for brevity (the option -u tells git to track the current
HW3-dev branch. You only want this option for the first commit on the
HW3-dev branch, consecutive commits can then simply be pushed with git push
without specifying the remote name origin and branch name explicitly).

You are now ready to submit the pull request by either following the link that
git suggests to you (see browser based PR method above) or use the GitHub
command line client and stay in the shell. The
command you are looking for is gh pr create. You tell the GitHub client gh
to create a pull request pr using the current branch. Be sure to check out
the help entry for this command as well (gh help pr create).

The PR is submitted simply with gh pr create --base main --fill. Here --base
main means that you want to merge the PR into your main (or master) branch.
The --fill option is a shortcut to fill the subject and body of your PR using
the latest commit information. If you omit it, your favorite editor will open
up and you can fill in the subject and body for your PR to your own liking
(checkout gh help pr create). You are done submitting your HW3 PR. (If you
want to be explicit about who should review your PR, you could add the option
--assignee cs107-sys-dev.)
Homework Feedback
The teaching staff will provide feedback on your homework through the GitHub
pull request you make to merge your HWn-dev branch into your master or
main branch. This will allow us to provide comments about certain lines of
code you write.
Once we are done providing comments and grading, you need to merge your
HW3-devbranch intomasterormain.You will lose 3 points if you do not follow this instruction.
Homework Rules
- Assignments must be completed individually
- Collaboration is permitted as long as discussions are limited to high-level considerations.
- For example, do not discuss implementation details
- Solutions must be your own!
Homework Late Policy
20 points will be deducted per day for late homework. Homework will not be accepted that is more than 2 days late.
For example, homework due on Thursday at 11:59 PM will no longer be accepted after Saturday at 11:59 PM.
Please contact me as soon as possible in the case of an unforeseen emergency or illness so we can figure out an appropriate plan of action on a case by case basis.
Homework Re-grade Policy
DO NOT ask a TF any re-grading questions until AFTER the HW grades have been released on Canvas.
Reasonable re-grading requests will be accepted up to 48 hours after the final grades are submitted. All re-grade requests must be sent to
cs107-sys-dev@lists.fas.harvard.edu
with the subject line: HWn-Pms: Regrade request, <Your name>, where n is the
assignment number, m is the problem, and s is the sub-problem (e.g.
HW2-P2b). Please only send re-grade requests to this email. All other concerns
should continue to be posted on Piazza.
Re-grade requests will only be accepted for a single problem (do not request regrading for an entire homework set). Note that a requested re-grade may cause your grade to go down since the entire problem will be reconsidered.
Piazza
The course will be using Piazza as a forum for discussion about course topics and questions from lecture or about assignments. Participation on Piazza by asking and answering questions will be considered in your participation grade. Students are encouraged to answer each others questions. To facilitate this participation, the teaching staff will wait between 12 and 24 hours to respond to conceptual questions in the week that a homework assignment is assigned. In the week that a homework assignment is due and for questions relating to course policies or clarifications of assignment expectations, the teaching staff will try to respond more quickly.
A Note on Groups
You will be assigned a project group at the beginning of the semester. The group will have 3 or 4 members and we will try to assign it based on your timezone as well as your coding ability as determined by the course survey.