Key Word(s): Version control, git
Lecture 4: Version Control with git
This lecture borrows content from https://github.com/rdadolf/git-tutorial. It has been edited for cs109 and for various versions of cs207.
Version control is a way of tracking the change history of a project. Even if you have never used a version control tool, you've probably already done it manually: copying and renaming project folders ("paper-1.doc", "paper-2.doc", etc.) is a form of version control. If you did the first homework, then you've definitely started playing around with git commands and probably have a lot of questions!
git is a tool that automates and enhances a lot of the tasks that arise when dealing with larger, longer-living, and collaborative projects. It has also become the common underpinning to many popular online code repositories, GitHub being the most popular. Others include GitLab and Bitbucket.
We'll go over the basics of git, but we should point out that a lot of talented people have given git tutorials, and we won't do any better than they have. In fact, if you're interested in learning git deeply and have some time on your hands, I suggest you read the Git Book. Scott Chacon and Ben Straub have done a tremendous job, and if you want to understand both the interfaces and the mechanisms behind git, this is the place to start.
Why should you use version control?
If you ask 10 people, you'll get 10 different answers, but one of the commonalities is that most people don't realize how integral it is to their development process until they've started using it. Still, for the sake of argument, here are some highlights:
- You can undo anything:
gitprovides a complete history of every change that has ever been made to your project, timestamped, commented, and attributed. If something breaks, you always have the choice of going back to a previous state. - You won't need to keep undoing things: One of the advantages of using
gitproperly is that by keeping new changes separate from a stable base, you tend to avoid the massive rollbacks associated with constantly tinkering with a single code. - You can identify exactly when and where changes were made:
gitallows you to pinpoint when a particular piece of code was changed, so finding what other pieces of code a bug might affect or figuring out why a certain expression was added is easy. gitforces teams to face conflicts directly: On a team-based project, many people are often working with the same code. By having a tool which understands when and where files were changed, it's easy to see when changes might conflict with each other. While it might seem troublesome sometimes to have to deal with conflicts, the alternative—not knowing there's a conflict—is much more insidious.
Git Basics
The first thing to understand about git is that the contents of your project are stored in several different states and forms at any given time. If you think about what version control is, this might not be surprising: in order to remember every change that's ever been made, you need to store a record of those changes somewhere, and to be able to handle multiple people changing the same code, you need to have different copies of the project and a way to combine them.
You can think about git operating on four different areas:

- The working directory is what you're currently looking at. When you use an editor to modify a file, the changes are made to the working directory.
- The staging area is a place to collect a set of changes made to your project. If you have changed three files to fix a bug, you will add all three to the staging area so that you can remember the changes as one historical entity. It is also called the index. You move files from the working directory to the index using the command
git add. Changes in files in the staging area are still not part of any repository! - The local repository is the place where
gitstores everything you've ever done to your project. Even when you delete a file, a copy is stored in the repo (this is necessary for always being able to undo any change). It's important to note that a local repository doesn't look much at all like your project files or directories. Git has its own way of storing all the information, and if you're curious what it looks like, look in the.gitdirectory in the working directory of your project. Files are moved from the index to the local repository via the commandgit commit. - When working in a team, every member will be working on their own local repository.
- An upstream repository allows everyone to agree on a single version of history. If two people have made changes on their local repositories, they will combine those changes in the upstream repository. In our case this upstream repository is hosted by
GitHub.- Note: This need not be the case; SEAS provides
githosting, as do companies likeAtlassian(bitbucket).
- Note: This need not be the case; SEAS provides
- This upstream repository is also called a remote in
gitparlance. - The standard
GitHubremote is called the origin: it is the repository which is given a web page onGitHub. - One usually moves code from local to remote repositories using
git push, and in the other direction usinggit fetch.
- An upstream repository allows everyone to agree on a single version of history. If two people have made changes on their local repositories, they will combine those changes in the upstream repository. In our case this upstream repository is hosted by
You can think of most git operations as moving code or metadata from one of these areas to another.
Common Tasks in the version control of files.
Forking a repository
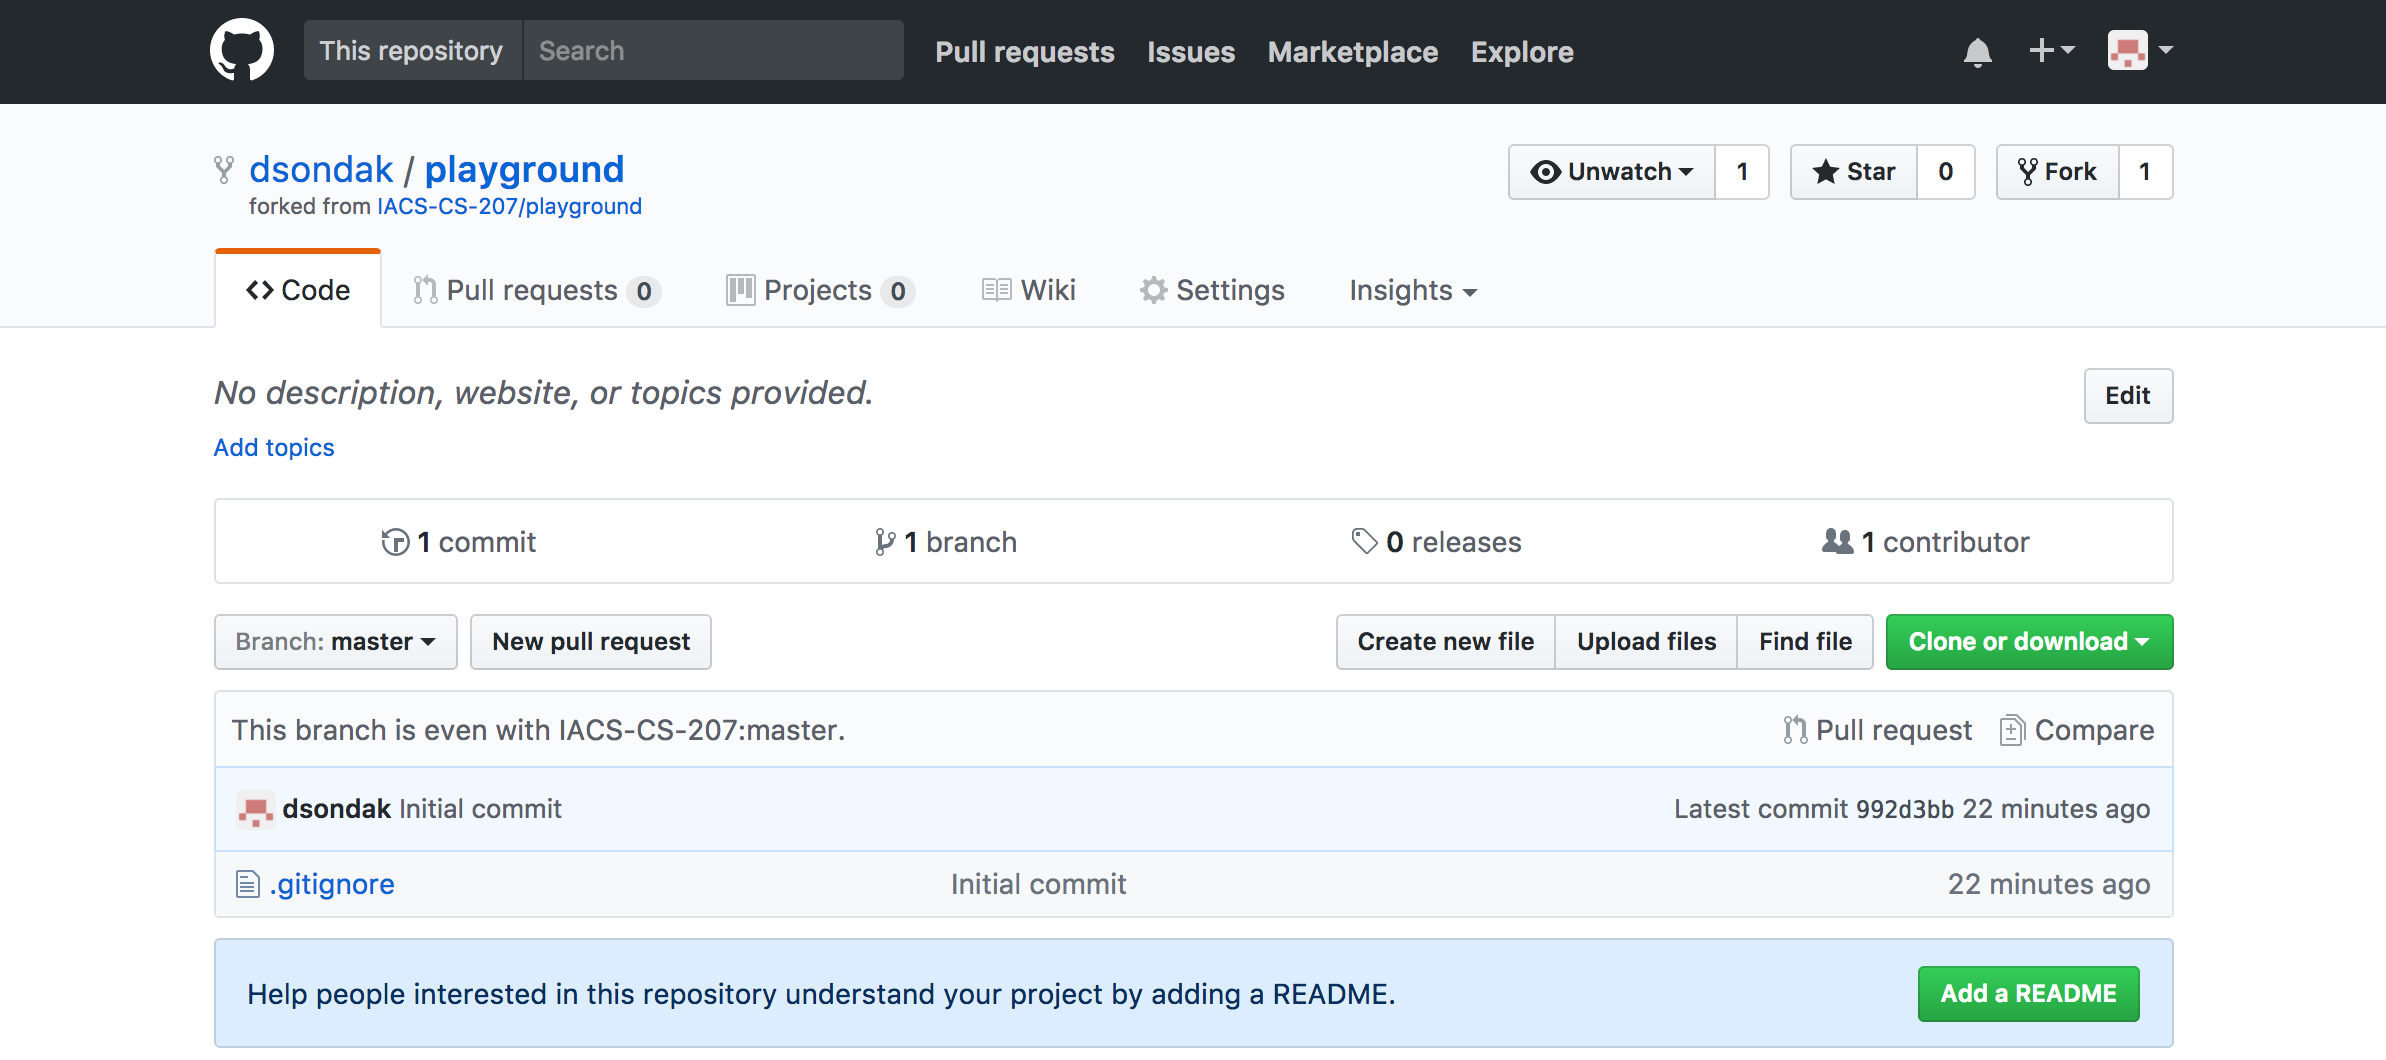
Forking a repository is performed on GitHub. You did this already in homework 1.

Forking brings a repository into your own namespace. It's really a cloning process (see below), but it's done between two remotes on the server. In other words it creates a second upstream repository on the server, called the origin.
The forking process on GitHub will ask you where you want to fork the repository. Choose your own GitHub id.
In this tutorial, wherever you see dsondak, substitute your own GitHub id.
The forking procedure leaves you with your own repository,
Cloning a repository
Now that we have a fork of the playground repository, let's clone it down to our local machines. Again, you already did this in homework 1. Now we're going to work through the meaning of the commands that you used. You will be asked to repeat a lot of the steps from homework 1, but this time the exact details will be explained.
In case you're wondering why you didn't just do this tutorial for your homework, here is a brief explanation. There is evidence that people learn very well and retain knowledge best when concepts are introduced and then re-iterated and recalled at a later time Make it Stick: The Science of Successful Learning. In this class, we first showed you some of the git mechanics. Now we'll redo everything to help reinforce the mechanics and shed light on the actual process. This time around, please pay very close attention to the steps you're taking and try to relate them to the concepts described in the tutorial text.
Getting organized
- Create a
CS207directory:~/Classes/CS207/. Some of you have probably already created a similar directory structure. If not, please create one now. Inside this directory, you should put your course repo, theplaygroundrepo, and any other CS207-related directories and files. - Inside
~/Classes/CS207/(or similar directory) create a directory calledgit_tutorial. - Move into the
git_tutorial/directory.
clone
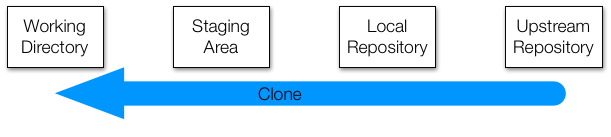
Cloning a repository does two things:
- It takes a repository from somewhere (usually an upstream repository) and makes a local copy (your new local repository)
- It creates the most recent copy of all of the files in the project (your new working directory).
This is generally how you will start working on a project for the first time.
Clone your forked playground repo to your CS207/git_tutorial/ directory.
Cloning a repository depends a lot on the type of repository you're using. If you're cloning out of a directory on the machine you're currently on, it's just the path to the
NOTE: From this point on, you will see cells containing code. You should type those commands into your terminal, NOT a Jupyter notebook. We use a notebook simply for demo purposes and to help you follow the steps.
WARNING! The code in the following cells is always preceeded by a combination of the following commands:
%%bashandcd /tmporcd /tmp/playground.
DO NOT type any of those commands into your terminal. They are used only in the notebook environment!
%%bash
cd /tmp
rm -rf playground #remove if it exists
git clone https://github.com/dsondak/playground.git
%%bash
ls -a /tmp/playground
Poking around
We have a nice smelling fresh repository. We'll explore the repo from the Git point of view using Git commands.
log
Log tells you all the changes that have occured in this project as of now.
%%bash
cd /tmp/playground
git log
Each one of these "commits" is an SHA hash. It uniquely identifies all actions that have happened to this repository previously. The long string of hex digits next to commit is the long hash and identifies the unique commit. There is some interesting history here: How much of a git sha is generally considered necessary to uniquely identify a change in a given codebase?
Getting help with commands
If you ever need help on a command, you can find the git man pages by hyphenating git and the command name.
Try it!
man git-log
Press the spacebar to scoll down and q to quit.
status

Status is your window into the current state of your project. It can tell you which files you have changed and which files you currently have in your staging area. You should use git status every other command in git! This is especially true in the beginning when you're just learning to understand how things work. (Eventually you can probably relax on this.)
%%bash
cd /tmp/playground
git status
Pay close attention to the text above! It says we are on the master branch of our local repository, and that this branch is up-to-date with the master branch of the upstream repository or remote named origin. We know this as clone brings down a copy of the remote branch: origin/master represents the local copy of the branch that came from the upstream repository (nicknamed origin in this case). Branches are different, co-existing versions of your project. Here we have encountered two of them, but remember there is a third one in the repository we forked from, and perhaps many more, depending on who else made these forks. We'll have much more to say about branches later in this lecture or the next lecture.
Branches represent a snapshot of the project by someone at some particular point in time. In general you will only care about your own branches and those of the "parent" remotes you forked/cloned from.
Configuration information is stored in a special file called config, in a hidden folder called .git in your working directory. (The index and the local repository are stored there as well...more on that in a bit.)
Reminder: Hidden files and directories are preceded by a dot. The only way to see them is to type ls -a where the a option tells the ls command to list hidden files and directories.
A few special files and directories
%%bash
cd /tmp/playground
cat .git/config
Notice that this file tells us about a remote called origin which is simply the Github repository we cloned from. So the process of cloning left us with a remote. The file also tells us about a branch called master, which "tracks" a remote branch called master at origin.
Finally, I set us up with a .gitignore file hidden in the repository folder. It tells us what files to ignore when adding files to the index and comitting to the local repository. We use this file to ignore temporary data files and such when working in our repository. Folders are indicated with a / at the end, in which case all files in that folder are ignored.
For example, one of the lines in the .gitignore file is *.so. That line tells Git to ignore all files with the extension .so.
Note that this particular .gitignore file is specialized to the Python language. Note too that when creating a GitHub repo, you are asked if you want to create a .gitignore file. You don't have to create one, but it's a good idea. Of course, you can always add one later if you so desire.
%%bash
cd /tmp/playground
cat .gitignore
Making changes
Ok! Enough poking around. Let's get down to business and add some files into our folder.
Now let's say that we want to add a new file to the project. The canonical sequence is "edit–add–commit–push".
%%bash
cd /tmp/playground
echo '# Hello world!' > world.md
git status
We've created a file in the working directory, but it hasn't been staged yet. Make sure you read and understand the output.
- Your local
masterbranch does not contain anything that is not on the remotemasterbranch. Sogitsays: Your branch is up to date withorigin/master. - You have some untracked files in your local directory that
gitis not keeping track of.Gitsenses this and informs you of this fact and goes one more step to inform you of what those untracked files are. Sometimes you want to stage these files and sometimes you don't. The decision is yours. Gitalso tells you that there is nothing to commit but that there are some untracked files and maybe you want to start tracking them.
add
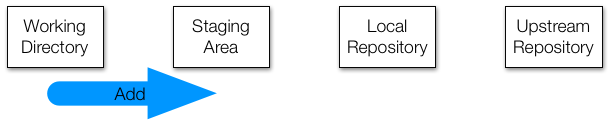
When you've made a change to a set of files and are ready to create a commit, the first step is to add all of the changed files to the staging area. That is what add is for. Remember that what you see in the filesystem is your working directory, so the way to see what's in the staging area is with the status command. This also means that if you add something to the staging area and then edit it again, you'll need to add the file to the staging area again if you want to remember the new changes. See the Staging Modified Files section at Git - Recording Changes to the Repository.
%%bash
cd /tmp/playground
git add world.md
git status
Now our file is in the staging area (Index) waiting to be committed. The file is still not even in our local repository.
Cautionary note
Instead of doing git add world.md you could use git add . in the top level of the repository. This adds all new files and changed files to the index, and is particularly useful if you have created multiple new files. Of course, you should be careful with this because it's a very annoying if you decide that you didn't want to add a file. I usually avoid this if I can, but sometimes it's the way to go. Note: The git add . sequence is far over-used and can cause collaboration problems. Please refrain from using it, especially if you're new to git.
commit
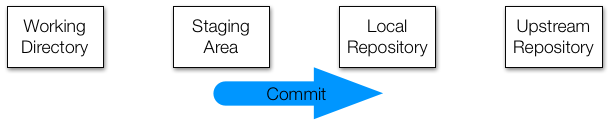
When you're satisfied with the changes you've added to your staging area, you can commit those changes to your local repository with the commit command. Those changes will have a permanent record in the repository from now on.
Every commit has two features you should be aware of:
- The first is a hash. This is a unique identifier for all of the information about that commit, including the code changes, the timestamp, and the author. We saw this already when we used
git logearlier. - The second is a commit message. This is text that you can (and should) add to a commit to describe what the changes were.
Good commit messages are important!
Commit messages are a way of quickly telling your future self and your collaborators what a commit was about. For even a moderately sized project, digging through tens or hundreds of commits to find the change you're looking for is a nightmare without friendly summaries.
By convention, commit messages start with a single-line summary, then an empty line, then a more comprehensive description of the changes.
This is an okay commit message. The changes are small, and the summary is sufficient to describe what happened.
This is better. The summary captures the important information (major shift, direct vs. helper), and the full commit message describes what the high-level changes were.
This. Don't do this.
%%bash
cd /tmp/playground
git commit -m "Hello world file to make sure things are working."
%%bash
cd /tmp/playground
git status
The git commit -m version is just a way to specify a commit message without opening a text editor. If you use a text editor you just say git commit.
Another nice command is to use git commit with the -a option: git commit -a. Note that git commit -a is shorthand to stage and commit a file which is already tracked all at once. It will not stage a file that is not yet tracked!
%%bash
cd /tmp/playground
git branch -av
We see that our branch, master, has one more commit than the origin/master branch, the local copy of the branch that came from the upstream repository (nicknamed origin in this case). Let's push the changes.
push
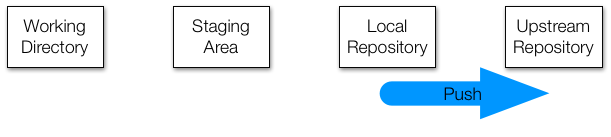
The push command takes the changes you have made to your local repository and attempts to update a remote repository with them. If you're the only person working with both of these (which is how a solo GitHub project would work), then push should always succeed.
%%bash
cd /tmp/playground
git push
git status
You can go to your remote repo and see the changes!
Remotes and fetching from them
If you're working with other people, then it's possible that they have made changes to the remote repository between the time you first cloned it and now. push may fail!
In our particular case of the playground repository, this is not going to happen, since you just cloned it and presumably haven't invited anyone to collaborate with you on it.
However you can imagine that the original repository dsondak/playground, which you are now divorced from, has changed, and that you somehow want to pull those changes in.
That's where fetch and merge come in.
remote
We have seen so far that our repository has one "remote", or upstream repository, which has been identified with the word origin, as seen in .git/config. We now wish to add another remote, which we shall call course, which points to the original repository we forked from. We want to do this to pull in changes, in case something changed there. This is a very useful workflow to know how to execute and understand.
%%bash
cd /tmp/playground
git remote add course https://github.com/dsondak/playground.git
cat .git/config
Notice that the master branch only tracks the same branch on the origin remote. The example in this notebook is a little silly because the origin and course remotes are the same. It will make more sense when you do it on your own. Your origin will be your fork of the original repo and your course will be the original repo. We haven't set up any connection with the course remote as yet.
Now let's figure out how to get changes from an upstream repository, be it our origin upstream that a collaborator has pushed to, or another course remote to which one of the teaching staff has posted a change.
fetch
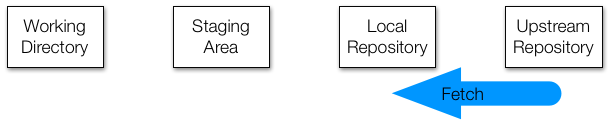
Let's say a collaborator has pushed changes to your shared upstream repository while you were editing. Their local repository and the upstream repository now both contain their changes, but your local repository does not. To update your local repository, you run fetch.
But what if you've committed changes in the meantime? Does your local repository contain your changes or theirs? The answer is that it contains a record of both, but they are kept separate. Remember that git repositories are not copies of your project files. They store all the contents of your files, along with a bunch of metadata, but in its own internal format.
Let's say that you and your collaborator both edited the same line of the same file at the same time in different ways. On your respective machines you both add and commit your different changes and your collaborator pushes theirs to the upstream repository before you do. When you run fetch, git adds a record of their changes to your local repository alongside your own. These are called branches, and they represent different, coexisting versions of your project. The fetch command adds your collaborator's branch to your local repository, but keeps yours as well.
%%bash
cd /tmp/playground
git fetch course
A copy of a new remote branch has been made. To see this, provide the -avv argument to git branch.
%%bash
cd /tmp/playground
git branch -avv
Indeed, the way git works is by creating copies of remote branches locally. Then it just compares to these "copy" branches to see what changes have been made.
Sometimes we really do want to merge the changes. In this tutorial, we want to merge the change from remotes/course/master. Eventually, we'll consider a case where you want to simply create another branch yourself and do things on that branch.
merge
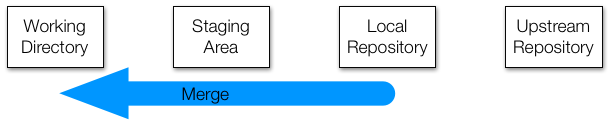
Having multiple branches is fine, but at some point you'll want to combine the changes that you've made with those made by others. This is called merging.
There are two general cases when merging two branches:
- First, the two branches are different but the changes are in unrelated places.
- Second, the two branches are different and the changes are in the same locations in the same files.
The first scenario is easy. Git will simply apply both sets of changes to the appropriate places and put the resulting files into the staging area for you. Then you can commit the changes and push them back to the upstream repository. Your collaborator does the same, and everyone sees everything.
The second scenario is more complicated. Let's say the two changes set some variable to different values. Git can't know which is the correct value. One solution would be to simply use the more recent change, but this very easily leads to self-inconsistent programs. A more conservative solution, and the one git uses, is to simply leave the decision to the user. When git detects a conflict that it cannot resolve, merge fails, and git places a modified version of the offending file in your project directory. This is important: the file that git puts into your directory is not actually either of the originals. It is a new file that has special markings around the locations that conflicted. We shall not consider this case yet, but will return to dealing with conflicts soon.
Let's merge in the changes from course/master: (The next 2-3 inputs only make sense if dsondak/playground master has been edited since you did the first fork.)
%%bash
cd /tmp/playground
git merge course/master
git status
We seem to be ahead of our upstream-tracking repository by some commits..why?
%%bash
cd /tmp/playground
git log -3
In the case you had edited the README.md at the same time and committed locally, you would have been asked to resolve the conflict in the merge (the second case above).
These changes are only on our local repo. We would like to have them on our remote repo. Let's push these changes to the origin now.
%%bash
cd /tmp/playground
git push
git status
You can combine a fetch and a merge together by simply doing a git pull. This will fail if you and your collaborator have worked on the same file (since you will have to merge by hand), but is a great shortcut when the files worked on are different. I use it all the time on a personal level too, to shift work between two different machines, as long as I am not working on both at the same time. The usual use case is day work on a work computer, and then evening work at home on the laptop. Read the docs if you are interested.
The safest thing to do is to first do the fetch followed by a merge. This is especially useful if you're new to git. It forces you to think about the steps instead of getting shocked by a pull that yells at you for a merge conflict.
Note to Mac Users
At this point, please add the .DS_Store file into your .gitignore file. You shouldn't version this annoying file. Here's what it does: .DS_Store.
Then, do a git rm .DS_Store in each directory that contains .DS_Store. Note: You should try to use your new-found Unix skills to execute a single Unix command line to recursively remove all .DS_Store files!
Please do this both for your playground and course repos. Be sure to commit and push!
Git habits
Commit early, commit often.
Git is more effective when used at a fine granularity. For starters, you can't undo what you haven't committed, so committing lots of small changes makes it easier to find the right rollback point. Also, merging becomes a lot easier when you only have to deal with a handful of conflicts.
Commit unrelated changes separately.
Identifying the source of a bug or understanding the reason why a particular piece of code exists is much easier when commits focus on related changes. Some of this has to do with simplifying commit messages and making it easier to look through logs, but it has other related benefits: commits are smaller and simpler, and merge conflicts are confined to only the commits which actually have conflicting code.
Do not commit binaries and other temporary files.
Git is meant for tracking changes. In nearly all cases, the only meaningful difference between the contents of two binaries is that they are different. If you change source files, compile, and commit the resulting binary, git sees an entirely different file. The end result is that the git repository (which contains a complete history, remember) begins to become bloated with the history of many dissimilar binaries. Worse, there's often little advantage to keeping those files in the history. An argument can be made for periodically snapshotting working binaries, but things like object files, compiled python files, and editor auto-saves are basically wasted space.
Ignore files which should not be committed
Git comes with a built-in mechanism for ignoring certain types of files. Placing filenames or wildcards in a .gitignore file placed in the top-level directory (where the .git directory is also located) will cause git to ignore those files when checking file status. This is a good way to ensure you don't commit the wrong files accidentally, and it also makes the output of git status somewhat cleaner.
Always make a branch for new changes
While it's tempting to work on new code directly in the master branch, it's usually a good idea to create a new one instead, especially for team-based projects. The major advantage to this practice is that it keeps logically disparate change sets separate. This means that if two people are working on improvements in two different branches, when they merge, the actual workflow is reflected in the git history. Plus, explicitly creating branches adds some semantic meaning to your branch structure. Moreover, there is very little difference in how you use git.
Write good commit messages
I cannot understate the importance of this.
Seriously. Write good commit messages.