Homework 3
Due Date: Thursday, October 10th at 11:59 PM
There are 3 problem in this homework.
Problem 0 Homework Workflow [10pts]
Problem 1 Using Git Revert [5pts]
Problem 2 Writing a Linear regression class using Object Oriented Programming (OOP) paradigm [45pts]
Problem 3 Writing Bank Account software using Object Oriented Programming (OOP) paradigm [40pts]
Problem 0: Course Workflow [10pts]
Once you receive HW2 feedback (no later than Friday Oct 4), you will need to merge your HW2-dev branch into master. This counts for points so ensure you do this.
You will be rewarded direct points for following all stages of the git workflow which involves
- 3pts for merging your
HW2-devintomaster - 5pts for completing HW3 on the
HW3-devbranch - 2pts for making a PR on
HW3-devto merge intomaster
Problem 1: Using Git Revert [5pts]
You have used the git revert command a few times throughout this class. This problem will teach you how to revert multiple commits all in one shot, which can be very useful when you have made many changes that broke your code or accidentally merged a branch you did not want to.
- Start on your
HW3-devbranch in yourHW3/directory.- Make a file called
hello.txtwith one line that saysThis is your_name.Try using theechocommand. - Create a commit for
hello.txtwith the messagemade hello.txt.
- Make a file called
- Off of
HW3-dev, create and switch to a new branch calledHW3-P1.- You should see that
hello.txtexists onHW3-P1. - Change
your_nameinhello.txtto the name of your favorite celebrity or athlete. So now the file should readThis is your_favorite_celebrity. - Commit this change with a message that says
P1 - Changed name to your_favorite_celebrity. - Delete
hello.txtand commit with a message that saysP1 - deleted hello.txt. - Verify that
hello.txtis deleted and that yourHW3-P1branch is 2 commits ahead ofHW3-dev.
- You should see that
- Switch back to your
HW3-devbranch.- Verify that your
hello.txtsaysThis is your_name.Why is this the case? Make sure you understand this. You do not need to submit an answer. - Merge your
HW3-P1branch intoHW3-dev. - Verify that your
hello.txtis now gone. Ifhello.txtwas the only file in yourHW3/directory, then you may find thatHW3/is gone as well. This is expected.
- Verify that your
You made some changes to your hello.txt on our HW3-P1 branch and merged those changes into your HW3-dev. But what if you decide that you did not want to delete hello.txt or change your name in hello.txt? This is where the git revert command is useful to reverse our history while still preserving it!
- Verify that you're on your
HW3-devbranch. - Find the SHA for the commit that you made when you changed the name in
hello.txt. If you are unfamiliar with git commit SHAs, this is a quick read to get you up-to-speed. - Find the SHA for the commit that you made when you deleted
hello.txt. - Now, we want you to use the
git revertcommand to reverse the changes of your two commits and then make only one additional commit with the reverted changes.- Explore the
git revertcommand (use the-hflag or Google) to figure out a way you can revert the changes of your two previous commits and then commit the revisions in a single commit. - The message for your single commit should read something like
P1 - reverted deletion of hello.txt and name change. - If you use
git revert older_commit_SHA^..newer_commit_SHA, then you will make two additional commits to revert your changes. This IS NOT what we want. - Hint: Checkout this stackoverflow thread.
- Explore the
- Your commit log on your
HW3-devbranch should have a sequence of 4 commits very close to the screenshot below. Please take a screen shot of your 4 commits, name the screenshotP1.png, and submit it.
Final deliverables:
P1.png
Problem 2: Linear Regression Class [45pts]
Explanation of Modules
So far, we have only been writing short Python scripts. However, when your code base starts to get bigger, you might want to organize your function and class definitions. The idea behind modules is to split your function and class definitions into multiple, logical units. When you want to use a function or class you simply import it from the module. In essence, a module is a file containing Python definitions and statements.
In this problem, you will create a module called Regression with custom Python classes for two related types of linear regression: Ordinary Least Squares Linear Regression and Ridge Regression.
You are prohibited from using standard regression libraries in Python such as sklearn. These classes must be your own. However, you are permitted to check your answers against the standard libraries. You may use numpy to perform simply computations such as computing averages.
Background
Consider the multivariate linear model: $$y = X\beta$$ where $y$ is a length $n$ vector, $X$ is an $n \times p$ matrix, and $\beta$ is a $p$ length vector of coefficients.
The goal is to find the coefficients $\beta$ so that the linear model fits the data the best. There are many approaches to this, but in this problem you will only consider two.
Ordinary Least Squares (OLS) Linear Regression
OLS Regression seeks to minimize the following cost function:
$$\|y - X\beta\|^{2}.$$The best fit coefficients are given by:
$$\widehat{\beta} = (X^T X)^{-1}X^Ty$$where $X^T$ is the transpose of the matrix $X$ and $X^{-1}$ is the inverse of the matrix $X$. Note that these are the coefficients that minimize the cost function given the data.
Ridge Regression
Ridge Regression introduces an $L_{2}$ regularization so the new cost function is:
$$\|y - X\beta\|^{2}+\|\Gamma \beta \|^{2}.$$where $\Gamma = \alpha I$ for some constant $\alpha$ and $I$ is the identity matrix.
The best fit coefficients for this case are given by: $$\hat{\beta} = (X^T X+\Gamma^T\Gamma)^{-1}X^Ty.$$
$R^2$ score
You will use the $R^{2}$ metric to assess the performance of the models. The $R^2$ score is defined as: $$\displaystyle R^{2} = 1-\dfrac{SS_{E}}{SS_{T}}$$ where $$SS_{T}=\sum_{i}{\left(y_{i}-\overline{y}\right)^2}$$ and $$SS_{E}=\sum_{i}{\left(y_{i} - \widehat{y_i}\right)^2}.$$
The ${y_i}$ are the original data values, $\overline{y}$ is the mean of the original data values, and $\widehat{y_i}$ are the values predicted my the model.
Part A: Base Class [10pts]
In a file called Regression.py, write a class called Regression with the following methods:
__init__(): Initializes an empty dictionary called params. Note that params should be a class attribute.
fit(X, y): Fits a linear model to $X$ and $y$. Stores best-fit parameters in the dictionary attribute called params. The first key should be the coefficients (not including the intercept) and the second key should be the intercept.
get_params(): Returns $\widehat{\beta}$ for the fitted model. Note that the fit method already stored the dictionary in params, so all you need to do is return that dictionary.
predict(X): Predict new values with the fitted model given $X$.
score(X, y): Returns the $R^2$ value of the fitted model.
set_params(): Manually set parameters of the linear model. The method should accept variable keyword arguments (**kwargs) containing model parameters. In this problem, it will be used to set the reguarization coefficient $\alpha$ in the Ridge Regression model.
This parent class should throw a NotImplementedError for methods that are intended to be implemented by subclasses.
Here is the interface for the Regression class:
class Regression():

    def __init__(self):
        # your code

    def get_params(self):
        # your code

    def set_params(self, **kwargs):
        # your code

    def fit(self, X, y):
        # your code

    def predict(self, X):
        # your code

    def score(self, X, y):
        # your code
Part B: List every function definition inside the module Regression [5pts]
In a file called P1B.py, import the Regression class using an alias and print a list of every function that can be accessed through this class by using a built-in python function. The list should print to your Terminal screen. Ensure you only print the functions for the Regression class from the module.
Part C: OLS Linear Regression [10pts]
Write a class called LinearRegression that implements the OLS Regression model described above and inherits the Regression class. Also place this class in Regression.py.
Hints:
- Note that the linear model $X\beta$ can also include an intercept term (e.g. $\displaystyle \beta_{1} x_{1} + \beta_{0}$). This is handled by appending a column of ones to the feature matrix $X$. See the
numpy.appenddocumentation. You may want to consider doing the append inside yourfitmethod. - The best-fit coefficients $\widehat{\beta}$ are determined by forming the inverse of $\displaystyle X^{T}X$. Rather than using the
numpy.linalg.invmethod, it would be better to use the pseudo-inverse.
Part D: Ridge Regression [10pts]
Write a class called RidgeRegression that implements Ridge Regression and inherits the LinearRegression class. Place this class in Regression.py.
Part E: Model Scoring [5pts]
You will use the Boston dataset for this part. You will want to split this dataset into a training and a test set. Please use an 80%-20% training-test split with a random_state=42, as seen below.
Import your Regression module using an alias. Instantiate your LinearRegression and RidgeRegression models. Using a for loop, fit (on the training data) and score (on the testing data) each model on the Boston dataset. Place this code in a file called model_scoring.py.
Note: Some of you may not be familiar with the train-test split pattern from the statistics world. All this means is that you take your dataset and split it into two parts, a training part and test part (often 80-20 split). You perform the analysis on the training data in order to determine the best-fit parameters in your model. Then, you use that model to make a prediction using data from the test set. Finally, you assess the performance of the model on the test set.
Print out the $R^2$ value for each model and the parameters for the best model using the get_params() method. Use an $\alpha$ value of 0.1.
Hint: The code below demonstrates how to do a train-test split. It also demos the way a user should interact with your classes. There are pieces of code that are missing, so you will need to fix this. Note that the demo uses the diabetes dataset, which you should change to the Boston dataset.
from sklearn import datasets
from sklearn.model_selection import train_test_split
#import regression classes

dataset = datasets.load_diabetes()
X_train, X_test, y_train, y_test = train_test_split(dataset['data'],
                                                    dataset['target'],
                                                    test_size=0.2,
                                                    random_state=42)

alpha = 0.5
models = [model1(alpha), model2(alpha)]

for model in models:
    model.fit(X_train, y_train);
Part F: Visualize Model Performance [5pts]
Evaluate how the models perform for various values of $\alpha$. Place this code in a file called model_performance.py.
- Plot $R^2$ versus $\alpha$.
- Calculate the $R^2$ scores for each model .
- Use at least 10 values for $\alpha \in [0.05, 1]$ for the Ridge regression model.
- Plot the two lines on the same graph.
- To change the parameters, use the
set_params()method that you wrote. - Save the plot as
P1F.png.
Be sure to create a readable and interpretable plot!. This means axes labels should be present and readable and the plot should have a legend.
Problem 3: Bank Account Revisited [40pts]
We are going to redo the bank account closure problem from HW2, only this time developing a formal class for a Bank User and Bank Account to use in our closure (recall previously we just had a nonlocal variable amount that we changed).
IMPORTANT
We will be grading this problem with a test suite. Put the enum, classes, and closure in a single file called Bank.py.
It is very important that the class and method specifications we provide in the problem description are used (with the same capitalization), otherwise you will receive no credit.
Some Preliminaries:
Open a Jupyter notebook and try the following code. This does not need to be submitted and will not be graded. This is just to get you warmed up with some Enum types.
First define two types of bank accounts.
from enum import Enum
class AccountType(Enum):
    SAVINGS = 1
    CHECKING = 2
Now, just to orient you, let's expore this class a little bit.
AccountType.SAVINGS
returns a Python representation of an enumeration.
You can compare these account types:
AccountType.SAVINGS == AccountType.SAVINGS
AccountType.SAVINGS == AccountType.CHECKING
Note that to get a string representation of an Enum, you can use:
AccountType.SAVINGS.name
Part A: Create a BankAccount class:
Constructor is BankAccount(self, owner, accountType) where owner is a string representing the name of the account owner and accountType is one of the AccountType enums.
Methods to modify the account balance of the account:
withdraw(self, amount)deposit(self, amount)
Note: You should raise an error or exception with these methods in 2 situations and provide informative error messages. The 2 situations you should handle are:- You should not be able to withdraw more money than the balance of the account.
- You should not be able to withdraw or deposit a negative amount.
Override the following methods:
__str__to write an informative string of the account owner and the type of account.- Remember: This is different than
__repr__.
- Remember: This is different than
__len__to return the balance of the account.
Put this class in your Bank.py file.
Part B: Write a BankUser class with the following specification:
Constructor BankUser(self, owner) where owner is a String that represents the name of the account owner.
Method addAccount(self, accountType):
- To start, a user will have no accounts when the
BankUserobject is created. addAccountwill add a newBankAccountaccount to the user based on theaccountTypespecified.- Only one savings and checking account per user. Raise an appropriate error otherwise.
Additional required methods:
getBalance(self, accountType)deposit(self, accountType, amount)withdraw(self, accountType, amount)
Note: You should raise an error or exception in these 3 methods when aBankUserdoes not have the account specified byaccountType.
Override __str__ to have an informative summary of user's accounts.
Put this class in your Bank.py file.
Write tests to make sure all of the methods for this class work properly. You should also test that your methods properly handle all of the invalid situations for both the BankUser and BankAccount classes.
Submit these tests in a file called P3B_tests.py.
Hint: Use try/except blocks (as seen below) to print out errors/exceptions thrown by the methods, so the entire python script can be run. Feel free to read more here.
def test_over_withdrawal(): #this test function should throw an
    user = BankUser("Joe");
    user.addAccount(AccountType.SAVINGS);
    user.deposit(AccountType.SAVINGS, 10);
    try:
        user.withdraw(AccountType.SAVINGS, 1000); #this should throw an Exception or Error
    except Exception as e:
        print(e); #print the message for the Exeption

test_over_withdrawal();
Part 3: ATM Closure
Finally, we are going to rewrite a closure to use our bank account. We will make use of the input function which takes user input to decide what actions to take.
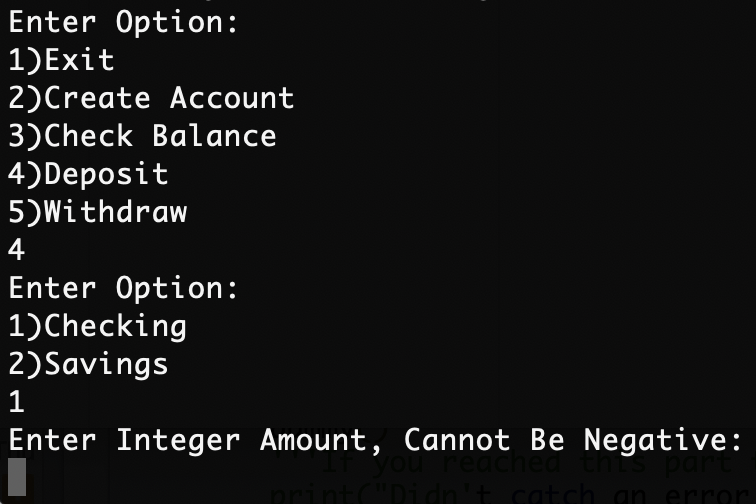
Write a closure called ATMSession(bankUser) which takes in a BankUser object. It should return a function called Interface that, when called, would provide the following interface:
- First prompt for a user will look like:

- Pressing 1 will exit, any other option will show a second set of options:
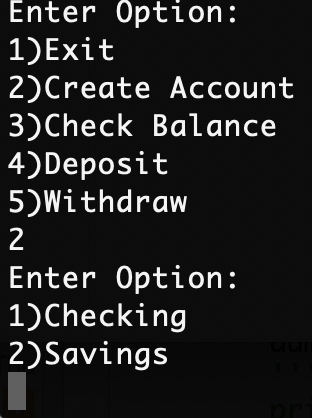
- If a deposit or withdraw was chosen, then there must be a third prompt:
- Upon finishing a transaction or viewing balance, it should go back to the original prompt.
This is to keep the code relatively simple, if you'd like you can also curate the options depending on the BankUser object (for example, if the user has no accounts then only show the Create Account option), but this is up to you. In any case, you must handle any input from the user in a reasonable way that an actual bank would be okay with, and give the user a proper response to the action specified.
Part 4: Put everything in a module Bank.py
We will be grading this problem with a test suite. Put the enum, classes, and closure in a single file named Bank.py. It is very important that the classes and method specifications we provided are used (with the same capitalization), otherwise you will receive no credit.
Final Deliverables:
- Bank.py [30 pts]
- P3B_tests.py [10 pts]