Part 1 [10 pts]: Course Survey
Problem 1 [10 pts]
Take the following survey: CS207 Introductory Survey.
Part 2 [90 pts]: Basics
A short example of the absolutely essential Unix commands can be found at the end of this notebook: Some essential Unix commands.
Problem 2: Unix
For these problems you will submit the single Unix command that outputs the desired result. Note that there are many different ways to do these problems.
Note on submission: For exercises A through D in this section, please submit the commands in a text file called P2.sh. Each line should correspond to a command representing the solution in order (ie line 1 problem A, line 2 problem B, etc.) Hence you're file should be 4 lines only looking something like
ls -ltr
cp p1.py p2.py
grep -v
wc p1.py
Exercise E should be submitting in a file called p2E.sh
Example Problem: Use two Unix commands (on a single line) to count the number of words in a file.
Example Solution:

A [5 pts]: You are provided with apollo.txt. Write a command that writes the number of lines in the file that contain a numerical digit to an output file called `apollo_out.txt' Your command should assume that the text file is in the current directory.
For example, if the provided text file was
a9
2c
abd
939
Then the resulting command should output a file with $3$.
B [5 pts]: Write a command that ouputs a single line that tells what the -c option does in grep.
(Hint: For git bash/Linux users You might need the results of grep --help.
For Mac users you will need to use the output of man and potentially clean it up with col (man grep | col -b might be a good starting point). See http://www.softpanorama.org/Tools/col.shtml)
For example, to look for the --V command the output should look like
-V, --version display version information and exit.
C [5 pts]: Write a command that counts the total number of .py files in your current directory.
For example, suppose the following files are in the current directory,
p1.py
Documents/
checkGrades.c
rejected_hard_problem.py
Then output of the command should be $2$.
D [5 pts]: Write a command that counts the number the files/directory that "others" DO NOT have read/write access to.
For example, if the directory contains 10 files and only and 6 of them have read/write permissions for "others", then the output should be 4.
E [10 pts]: Write a bash script that counts and prints the number of lines of each file in the current directory along with its name. Your resulting file should be called p2E.sh.
For example, if the directory contains the files,
p1.py
Documents/
checkGrades.c
rejected_hard_problem.py
then the output might look like
p1.py 10
checkGrades.c 100
rejected_hard_problem.py 10000.
Problem 3: Git crash course
A vital part of software development is being able to manage changes and the entire workflow of a project. Version Control Systems (VCS) are the primary tool used to keep track of actual changes to code. Git is the most common VCS used and it is what we will use for this course.
Grading on this problem will be based on the edits you make to your branch as well as a screenshot that we'll ask for during the assignment.
Part A [10 pts]: Getting Started
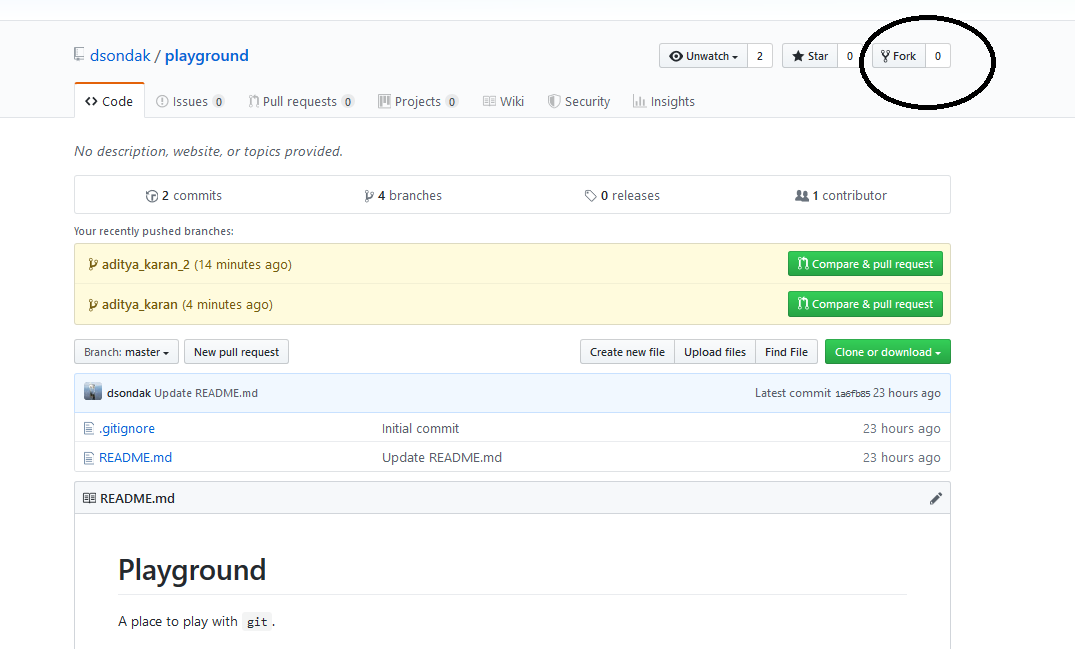
Before we make changes we're first going to start working off an existing git repository (repo). Go to https://github.com/dsondak/playground. There will be a green button that says Clone or Download. The website will give you a URL.
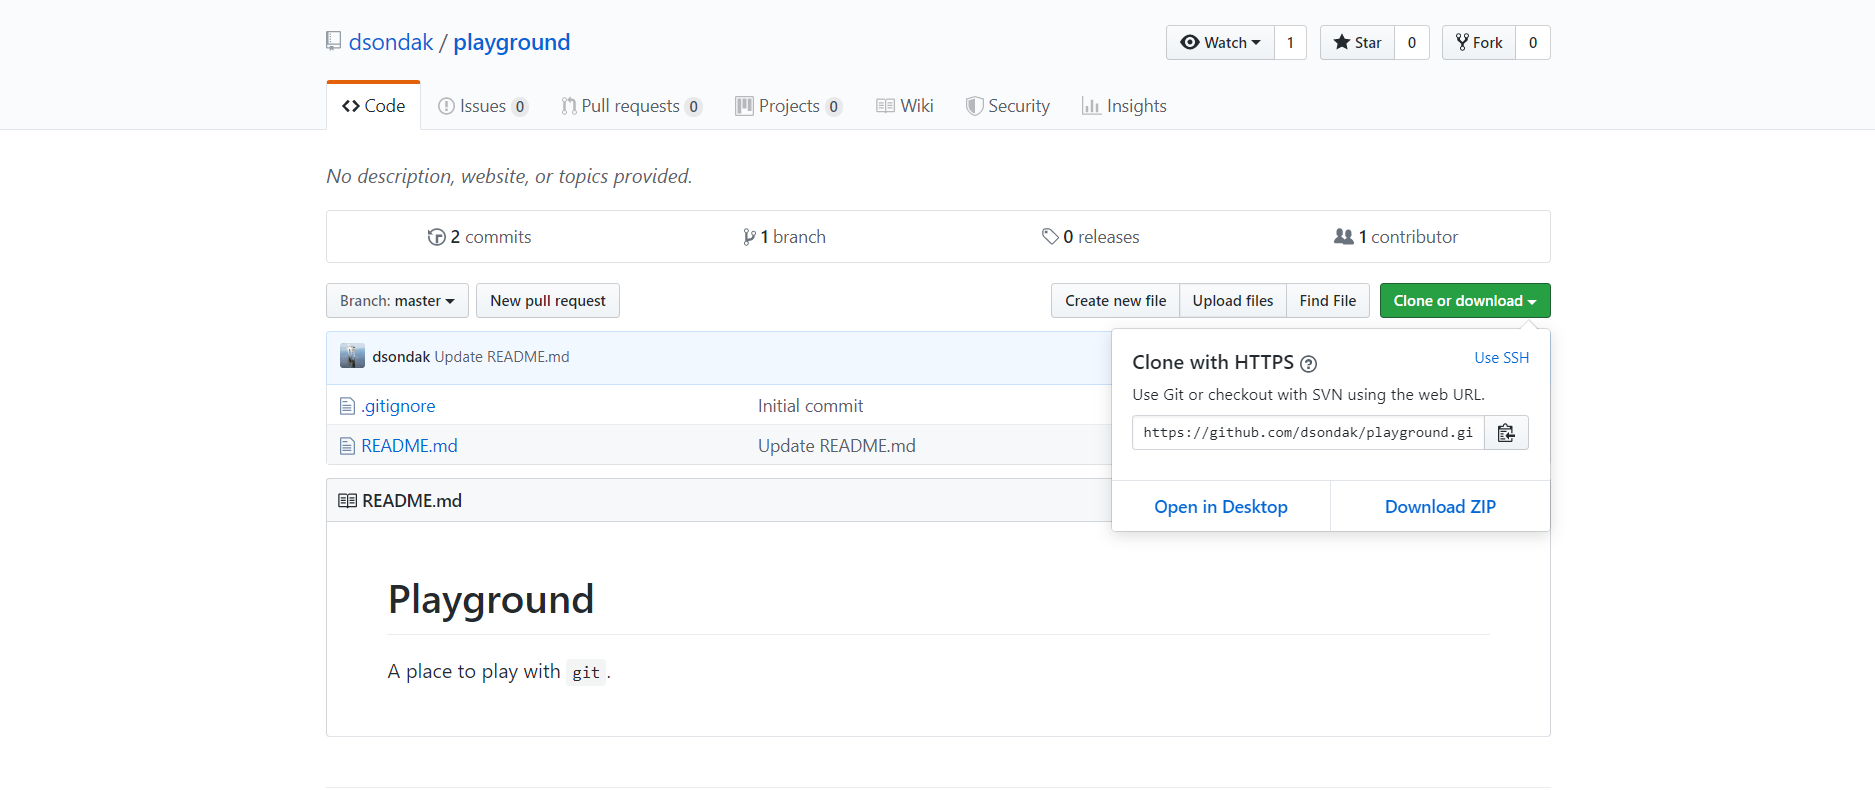 Copy that URL. In either your terminal or Git Bash go to your homework directory for this assignment.
In the command line type:
git clone
Now you'll see an entirely set up git repo for you with all the content.
The problem with this approach is that you do not have push access to this public repo. Therefore, when you try to do the next exercises and push your changes, you will get a permission denied error. There are two ways to solve this:
- Have the repository owner give you push access --- This will be challenging with a course this size.
- Create your own fork of the repository and make a pull request (PR) back to the original repository when you've made all the changes. This is the approach that you will take in this assignment.
To use the forking workflow, use the following steps:
- Fork the repo by clicking the fork button in the upper right hand corner

- Now you have a forked copy of the repository! From this forked repo, copy the repo link (as discussed above) and type
git cloneinto your command line. Now you have a local copy of the forked repository. - Complete Part B on your fork. When you've made your changes, make a PR into the
masterbranch ofdsondak/playground. We will review your work through the PR.
Note that Part C requires you to set up a fork. You've already done that in this step. However, part C goes one step further and discusses remotes so make sure you still complete that part.
Part B [25 pts]: Branches and Merge Conflicts
One of the most fundamental concepts in git is the concept of a branch.
A branch is an area from which code can be updated or modified and continually branched. It's good practice to NEVER make changes directly on master but create a branch to work off of during development. To see a list of branches type
git branch --list
If you've started this assignment early, you may only see a few branches. If you started after others you may see many other branches!
To switch to the TF branch type
git checkout TFtestbranch
git checkout moves you from one branch to another.
If you type ls you'll see that there's an extra file on this branch. Different branches can contain different files in addition to different content in exisiting files.
Next you will make your own branch. First switch back to master - type
git checkout master.
Now you're ready to create your first branch (you should name it firstname_lastname)
git branch firstname_lastname.
To move to this branch use
git checkout firstname_lastname.
And ta-da you've created your own branch!
Create one more branch. You can use a single command
git checkout -b firstname_lastname_changes.
(This is simply doing a combination of branch and checkout in one line)
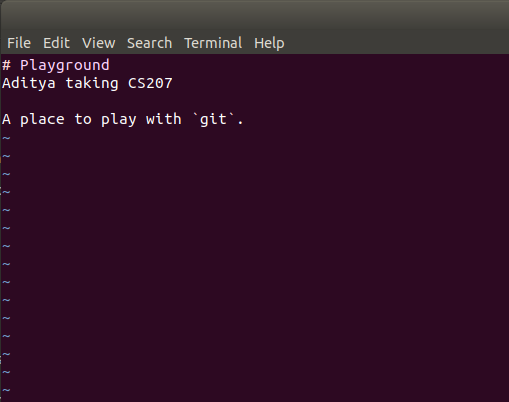
Now update the README.md. Open up README.md and add your name to the top of the file. Use Markdown format. Save and close the file. Note: You may use your text editor of choice to edit the file. DO NOT use Word or Google Docs.
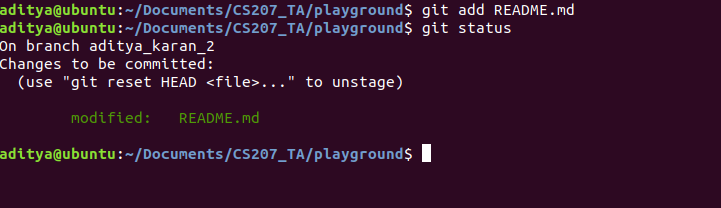
In the same terminal, type git status. This is how you see changes to the repo.
git status will summarize everything that is going on in your branch and is immensely useful (running git status
is almost always a good thing to do). A good practice is to use git status after every git action you take.
Now we'll actually add the file. Type git add README.md.
This lets git know that you are preparing to commit README.md (formally this is called staging).
After that if you try git status you should see something like:
Now type git commit.
You'll see a texteditor pop up. Don't get worried by the stuff already there - on the first line add a description of
what this commit is doing (i.e updating the README with your name). Note: Depending on your system, git commit may open different kinds of text editors. In general, the default text editor is vim (or vi). You can change the default if you prefer. For now, if you're not familiar with vim, simply type enter the following commands:
- Type the letter
ifor insert. This opens insert mode. - Enter your message.
- Press the escape button,
esc. This exits insert mode. - Type
:wq. The:enters command mode.wmeans write andqmeans quit.
Congrats! You've made your first commit.
(You can also do git commit -m "YOUR COMMIT MESSAGE" to avoid the texteditor popping up.)
If you type git status you'll see git telling you there's nothing new to commit.

However, this has only changed your history locally! You still need to let the world (that is remote/github) know that you've made these changes. To accomplish this, enter
git push
in the terminal.
But when you do that you'll get a funny error message
fatal: The current branch
It'll also tell you how to resolve the issue. For my branch
git push --set upstream origin aditya_karan_2
What this is doing is it's telling git which remote repo it needs to push to. By default if you type in "origin" it will reference the remote repo that you clone/pulled from originally (each time you add a new branch you'll have to set the upstream if you want to push it to the remote. ).
Follow those instructions and then push.
(If you haven't set up authentication you'll have to type in your github username/password)
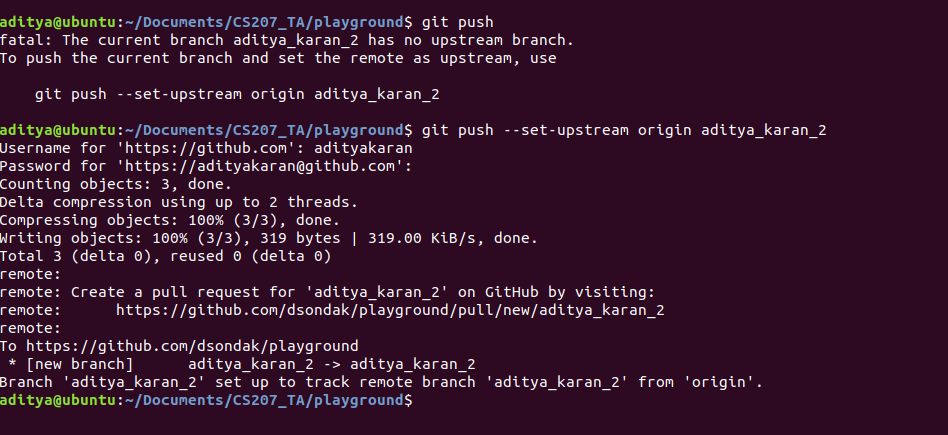
After that it'll be updated in remote (Github). Your collaboraters (and your TFs if you gave them access) will now be able to pull from your branch!
Now let's try something else.
Let's go back to your branch "firstname_lastname":
git checkout firstname_lastname.
If you open up the README - you'll see that your name isn't on the README. This is expected as you only made changes on a different branch.
Now we'll update this README - instead of your name add some of the courses you're planning on taking this semester and commit (don't push!) like above.
Now we'd like our current branch to reflect the changes from the branch we made earlier (branch firstname_lastname_changes). To combine branches while on branch "firstname_lastname" type
git merge firstname_lastname_changes.
You should notice in your terminal AUTOMATIC merge failed; fix conflicts and then commit.

Don't worry - this is expected! What has happened is the history of these two branches have diverged and git doesn't know what the result should be (should it keep your changes or your colleagues changes? which one is correct?). In some cases (if the changes are distinct enough) git is smart enough to do the merge. However, in this case it cannot and there is a merge conflict. Git keeps both changes and provides annotations to help you decide which one to keep. We'll walk you through resolving the merge conflict in this exercise.
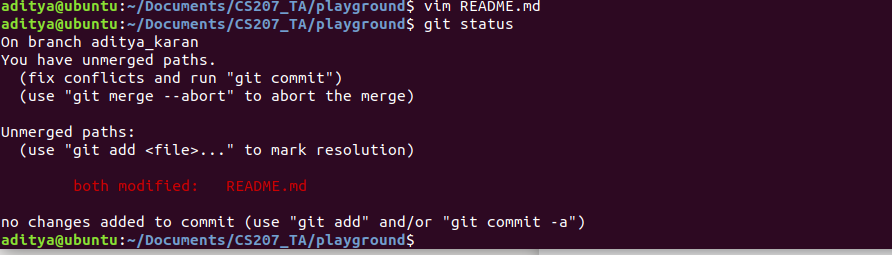
Type git status - it should tell you which files neeed to be merged.
Lets open up the README.
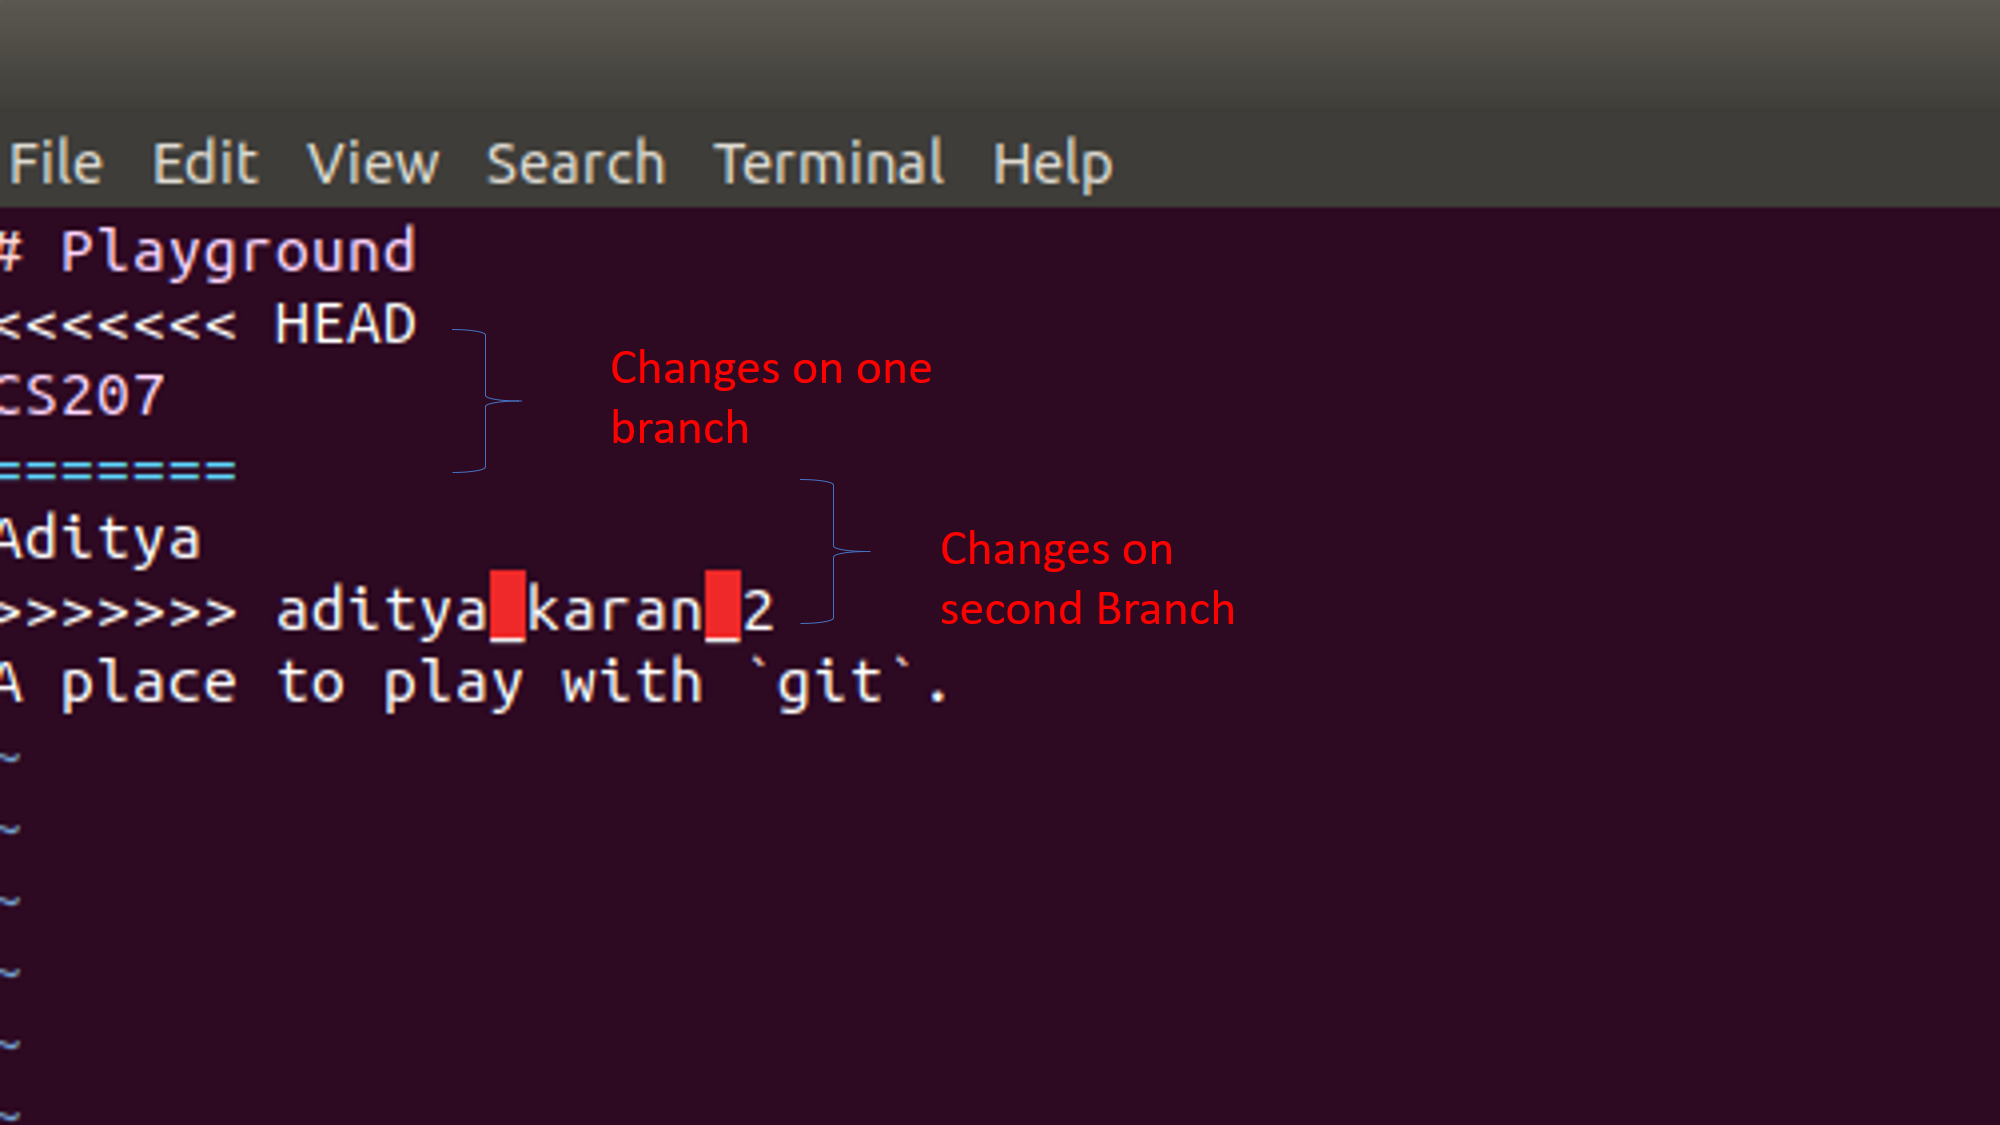
Take a screenshot of this file similar to one above and call it P3_merge.png (don't add the red text though..). Commit/push this file as well.
.-Commit/push-this-file-as-well.)
You need to go in and manually update it to reflect the final state you want (and then remove the <<<<<, =====, >>>>> symbols).
You can see that in git status there are unmerged paths.
Once you're ready you should have a clean file to commit. Go ahead and add the file and commit with a message that says you've resolved the merge conflict.
Push to remote and congrats for solving the merge conflicts!
Connecting back to lecture
Recall the meaning of the symbols:
- The content between
<<<<<<< HEADand=======shows what the current state of theHEADis. You can think of this as what existed before you tried to merge your changes. This is the "head" of the current branch; the most recent change. - The content between
=======and>>>>>>> xxxxxxxshows what changes are trying to be merged in. This is essentially the conflict. Thexxxxxxxwill usually be the conflicting branch name of the conflicting commit hash. - Your job is to decide which thing to keep. In practice, you might need to call up your colleague to discuss. In the current exercise you can just do this yourself because you know which change to keep.
Don't be afraid of merge conflicts!
Let's add one more feature.
In your firstname_lastname branch add another line that says what year you are (G1, junior, whatever it is). Follow the usual add - commit - push cycle to get the changes to the branch on the remote repo.
Now suppose you want to revert this change (or any change really). The magic of version control is that it's relatively straight forward to go back to a previous version!
To revert a commit - first identify the commit you want to rollback. To do this type
git log
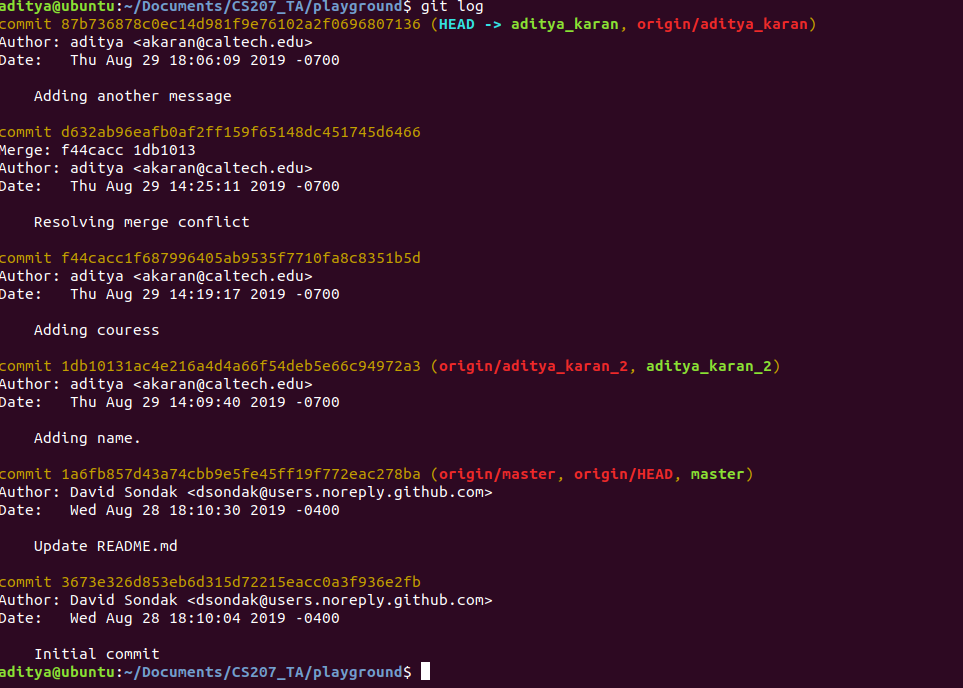
You'll see several commits - the commit "hash" or id is the long string (in this example my latest commit starts with 87b......)
Here you want to revert my last commit. To accomplish this, just type
git revert LONGHASH.
All this does is add a new commit, which is just restoring to the state that occured before the above commit.
To push the change simply git push. Now everyone can see the most up to date version of this branch which will be your version of the file without your year and just your name/courses.
Note that we didn't "delete" the offending commit. Instead we added a new commit on top of the offending commit - that way there's still a history of all the changes that occured. git revert is history preserving in that the history stored in git is never modified.
You may also want to revert changes that you've committed locally but haven't push to remote. This is what git reset will do.
Recap and Deliverables
That was a lot of stuff! At this point, working from you firstname_lastname branch, issue a pull request back to the original repository. A member of the teaching staff will approve and merge your PR. Your branch should include an updated README.md file and a file P3_merge.png. We will also be able to see your commit history to make sure you followed all the steps.
Part c [15 pt]: Forking and setting up remote
In the last section we were mostly working off of branches. Branches are great but sometimes we need to be able to fully change a given project. Often times a project might be spun off an existing repo and take on a life of its own (ex: Ubuntu is a fork of the Linux project). The fork may still contribute back to the original project from time to time, but it is usually meant to be an entirely new project. Branches on the other hand are meant to be confined within a single repo.
To fork click the button above and choose your personal username.
This creates an entire copy of the original repo under your username. In this forked version you have complete control of the project and can make whatever changes you want.
Clone this repo into a new directory on your local machine.
Sometimes even with a forked version we would like to track another project (for example the original repo).
To check the status of the remote you can do
git remote -v
You'll see two lines that both point to your current forked version.

To set an upstream version you can type
git remote add upstream ORIGINAL GIT Repo.git
Now if you do git remote -v you'll see that upstream is set to the original repo.

Take a screenshot of this file similar to one above and same it P3_remote.png and commit/push as well.
The diagram you've created is essentially this (poorly) done cartoon:
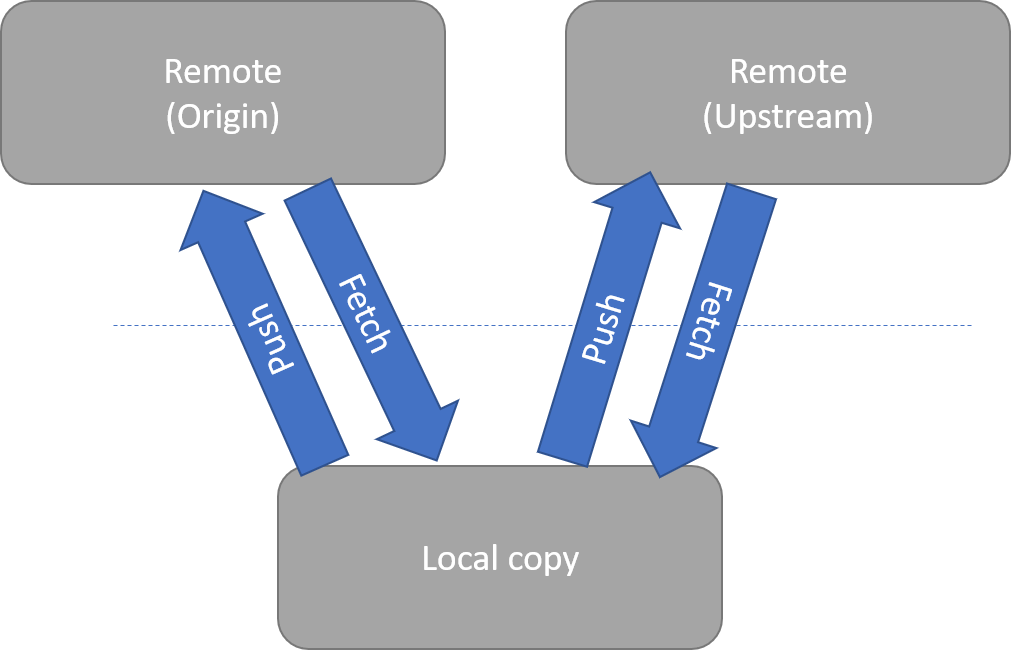
You have two remote repos from which you can fetch (receive changes from remote) and push (make changes to remote). There are often situations where you might fetch from one remote (say a fully tested and reflecting the latest good build) and push to another (a QA remote). You can specify which remote you wish to pull/push from
(ex git pull origin master vs git pull upstream master)
Please do the following:
- Some of you named your course repo
cs207work. Please rename itcs207_firstname_lastname. If you have already done this, then you're done and you can skip to Step 2. If not, here's how you can rename your repo:- Go to your
GitHubrepo and click on theSettingstab. Change the name underRepository name. - Now go to the local copy of your repository (remember, we cloned this last time). It's probably named
cs207workif you're doing these steps. - Type
git remote set-url originwherehttps://github.com/github_username/cs207_firstname_lastname.git. What you just did was change the url of the remote repository. Recall thatoriginis the short name of your remote repository. - As a sanity check, type
git remote -v. It should list the correct url now. - Finally, your directory should be updated to avoid any future confusion.
- To navigate up one directory, type
cd ... - Type
mv cs207work cs207_firstname_lastname. You just renamed the directory!
- To navigate up one directory, type
- Go to your
- Give the teaching staff access to your private repository:
- Go to your private repository again on
GitHub. - Go to
Settingsagain. - Click on
Collaboratorson the left side. - Add the TFs and me. Our
GitHubusernames are:- dsondak
- adityakaran
- bhavenp
- feiyu-chen96
- lindseysbrown
- Go to your private repository again on
Now you're ready to create your first commit to the master branch. Set up a homeworks/ directory with the following steps (assuming you're in the root directory of the repository):
- mkdir homeworks/
- cd homeworks/
- echo # Homework Directory > README.md
- git add README.md
- git commit -m "Setting up homeworks directory."
- git push
WARNING: This is likely the only time you will make a commit directly to the master branch.
These steps will become second nature to you after this homework and the next few lectures. What you've done here is create a homework directory using some common Unix commands, generated a README file also using a common Unix command, and following the usual git workflow of staging (via git add), commiting changes to your local repo (via git commit), and pushing to the remote repo (called origin). Note that the -m option to git commit allows you to specify a commit message directly from the command line rather than via your system's default text editor (e.g. vim).
Problem 5 [10pt]: Write some Markdown
The task in this problem is to re-write the README.md document in the homeworks/ directory. This will be done with the Markdown language.
Markdown is a very easy language to work with. Here's a Markdown cheatsheet with everything you need: Markdown Cheatsheet.
The task is to write a short Markdown document. Your Markdown document must have at least one of the following:
- Two different types of headers
- A List
- A table
- A link
You can include other features if you want.
Some Unix References and Examples
This extra set of exercises is for your reference in case you don't have much experience with Unix. Please do your best to become comfortable with the command line throughout the semester. There are plenty of resources available on learning how to use the command line efficiently. Here is one to get you started: http://linuxcommand.org/lc3_learning_the_shell.php#contents.
Macs come with a command line app (terminal.app) and since Macs are loosely similar to Unix the terminal commands are pretty much the same as those in Linux distributions. Windows is a bit different, and because of this, I had you install git BASH if you are using a Windows machine. What this means is that, even if you are using a Windows OS, you can still use the nice Unix commands as long as you are in the git BASH terminal.
It is true that there are various options for using git from the Desktop (e.g. see GitHub Desktop). However, it is more useful for you to be able to do things from the command line. The reasons for this are that the command line is not going anywhere any time soon and that I can't predict what GUI your future company/group will want you to use. You'll be much more versatile using the command line.
What this means is that you need to learn a little bit about how to navigate with the command line. There are a few essential commands that you absolutely must know. You'll pick up the rest as you go through your life. Here are the essential ones:
- ls: list the contents of the current directory
- cd: change to a new directory
- mv: rename a directory or file OR move a directory or file to a new location
- cp: copy a directory or file
- pwd: print the working directory
- mkdir: create a new directory
- rm: remove a file (you can remove a directory with rm -r)
Let's try to work with these a bit. In the following steps, you should hit the return key after typing each command.
- Open up a terminal and type
pwd. The output should be your home directory. - Next type
ls. You should see all the files and directories in your home directory. Notice that if you typels -lyou get a list with more information where the files and directories are ordered alphabetically. Typingls -ltsorts the list by date/time created with the most recent file/directory at the top.ls -ltrjust reverses the order of the sort; now the most recent file/directory is at the bottom. - Now type
mkdir mydir. Voila! You have just created a new directory. Trylsagain. Do you see the new directory? - To enter that directory type
cd mydir. You just changed into your new directory. Typepwdto see where you are. - Now that you're inside your new directory, let's create a file in there.
- Type
echo 'Hello world!' > newfile.txt - Type
ls. You should see the next text file! - To see the contents of the file, type
cat newfile.txt.
- Type
- Suppose you now want to rename
newfile.txttoREADME.txt. Just executemv newfile.txt README.txt. Typelsagain if you wish. - Maybe you really wanted to keep a copy of
newfile.txt. Just docp README.txt newfile.txt. As usual,lswill show you what you want to see. - What if
newfile.txtshould actually be in a different directory? Let's do the following:mkdir newdirmv newfile.txt newdir\- Altneratively, you could give the entire path of the new directory (not necessary here). Here's how you would do that:
pwd(just to see the current path)mv newfile.txt path_from_pwd/newdir/
- That was fun, but this directory is completely useless to use now. Let's delete it.
- First, you need to get out of the current directory. You can't delete a directory from within it!
- To go up one directory, just type
cd ...- Unix Note: In Unix,
.stands for the current directory and..stands for the parent directory (that is, the directory containing the current directory. Hence,cd ../changes to the parent directory of the current directory. - Unix Note: If you want to go up two directories, just do
cd ../../. You can use the same pattern for $n$ directories.
- Unix Note: In Unix,
- Now type
rm mydir. You should see the messagerm: mydir/: is a directory.rmcannot be used to remove directories as-is. It can only remove files. - To remove the directory type
rm -rv mydir. The-roption says to recursively remove the directory and any contents. The-voption says to be verbose while removing files. You don't really need the-voption, but I like use it so I can see progress.
That was a whirlwind tour through a few of the more useful Unix commands. It won't take you long to use them effectively, but you must use them.
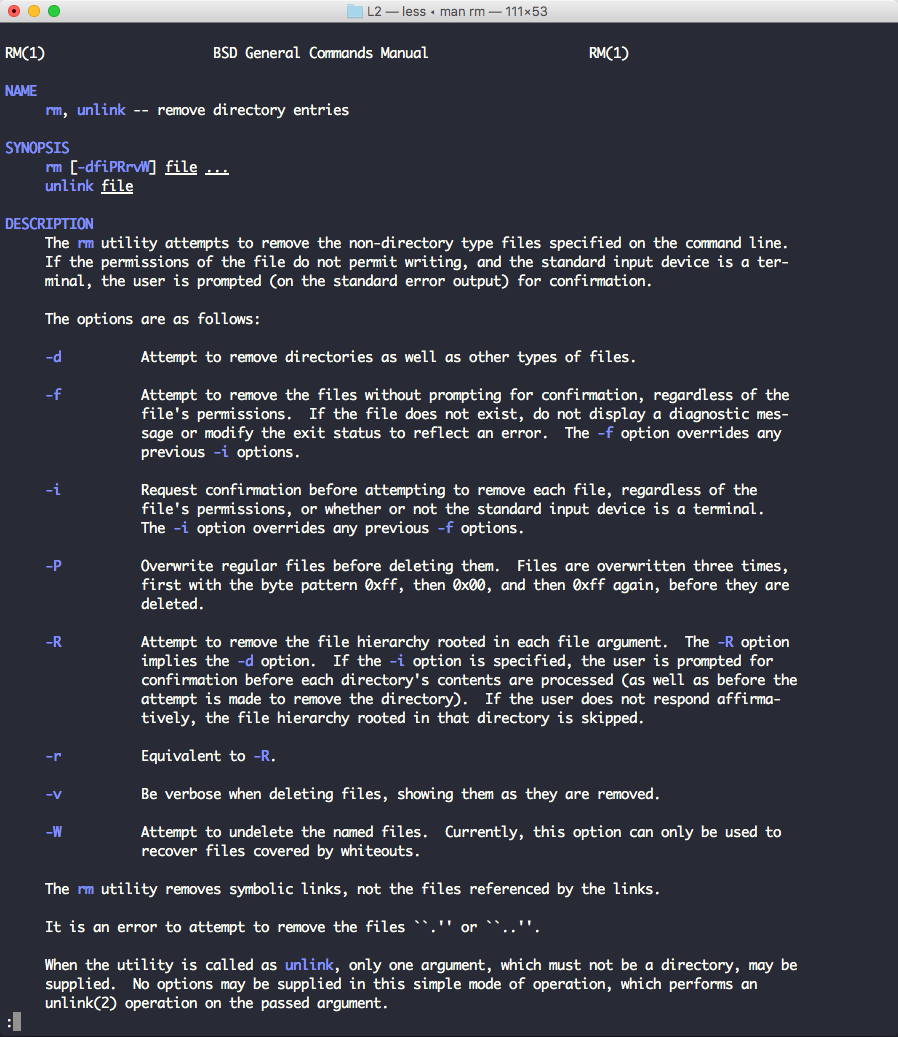
Note: If you want more information about any command, just type man into the terminal. This will bring up the manual page for that command. You will see all sorts of information. To scroll down, just hit the space bar. To exit the man page just type q (for quit). Here's an example of a portion of the man page for the rm command:
Bonus Command
Suppose you want to copy a file from a different location to your current directory. Well, recall that the current directory is represented by the . object. Here are a few things you can do:
cp path_to_file/file .: Will copy file to your current locationcp path_to_file/file ./sub_dir: Will copy file to the directorysub_dirin your current locationcp ../file .: Will copy file from the parent directory to your current location There are other, similar patterns to accomplish roughly the same thing. You'll ../figure them out as you go through life.